If you have ever thought about your privacy on the Internet and want to do what you can to avoid that other people might see what you're up to on the Internet then this is a guide for you. There are many reasons for wanting to stay anonymous on the Internet. They can range from political standpoints to simply wanting to do what you can to prevent companies from collecting personal information about you.
If you use Google then you probably know that information about you, your whereabouts, habits and so forth are being collected, stored, processed and used to for example targeted advertising based on your activities. Sometimes this is a good thing and it can help you a lot. But sometimes you're just not comfortable with this. And if you're not comfortable with it then here's a guide to help you to do what you can to protect your privacy. It shows how to auto connect to OpenVPN on Linux Mint 18. It is very simple and once you have followed all the steps you really don't have to do much more than boot up your computer.
Table of Contents
How to auto connect to OpenVPN on Linux Mint 18
Basically, there's probably no better way to protecting your privacy on the web than to make sure that your computer can auto connect to OpenVPN at startup. And folks, here's the step-by-step guide that takes you through the easy process of auto connect to OpenVPN on Linux Mint 18. After you have followed these steps all you have to do to stay private is to start up your computer. If you do your browsing only from your Android device fear not because it's very easy to install OpenVPN on these devices. If you're using Ubuntu then check out this guide on how to install another form of VPN (PPTP).
Surfshark VPN Exclusive Offer - 82% off ($2.39/month):
♦ Hide your browsing (no logs), Anonymize Streaming and Downloads
♦ Wireguard Protocol support for VPN.
♦ Circumvent Geo/Country Restrictions and access worldwide content
♦ Works on Windows, Mac, Linux, Android, iOS, Router, and more
♦ 1 TB Encrypted Storage
♦ Money back guarantee - Sign Up Now
First of all, make sure that you are connected to the desired OpenVPN connection. Then follow these steps.
Part 1: Terminal window
Open a terminal window (ctrl + alt + T) and execute the command nmcli con
Then copy the UUID of your VPN connection. If you have many VPN connections added then choose the UUID of the one you want to auto connect to. If you use IPVanish, the name will be something like ipvanish-NL-Amsterdam-ams-a02 or similar. You will find the UUID under the column UUID and it contains of numbers and letters, for example 104c28ec-9a22-4615-9110-6a4839a1386a.

Now type the following command: nmcli con up uuid <yourUUIDhere>. This should start your desired OpenVPN connection.

As a result, your VPN connection should now start. On the top right of your screen a pop up box will say VPN connection has been successfully established if everything is done properly.

Part 2: System Settings
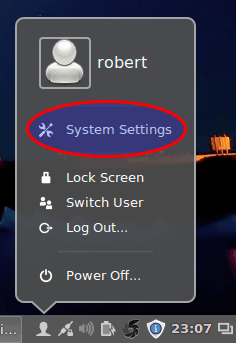
Click on Startup Applications.

Click on Add, then choose Custom command.
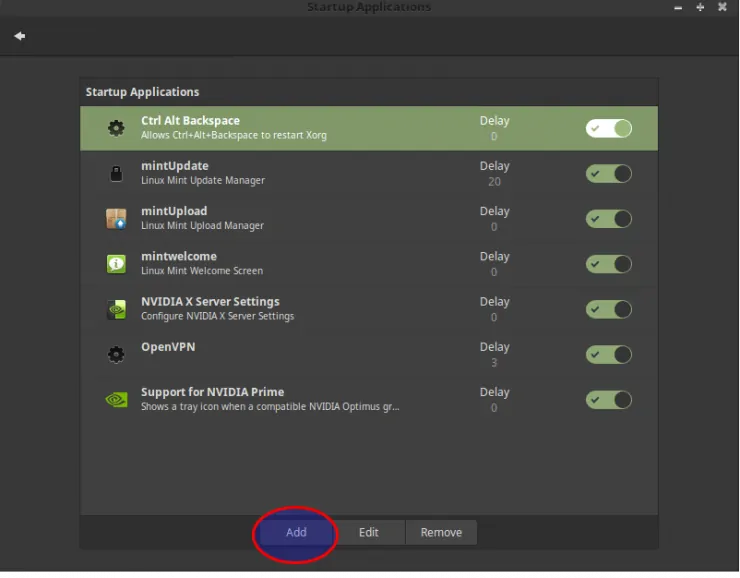

Type a desired name in Name, for example OpenVPN.
Then, in Command, type nmcli con up uuid <yourUUIDhere>.
Set the Startup delay to 3.
So this is what it should look like:
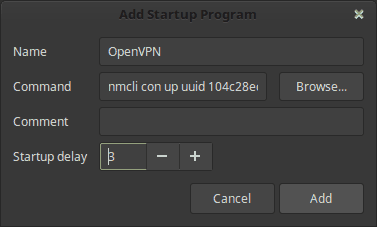
Click Add, and then restart your computer.
Once Linux Mint 18 has booted your OpenVPN connection should start - that is, your computer will auto connect to your OpenVPN on Linux Mint 18. On the top right of your screen a pop up box will say VPN connection has been successfully established if everything is done properly.
So now you're all set and your computer will auto connect to OpenVPN!
Further reading on OpenVPN on Windows HTPC
If you or any of your friends are using Windows then make sure that you check out our excellent guides on how to install OpenVPN on Windows HTPC and how to configure OpenVPN on Windows. Check out our guide on how to install IPVanish on Windows. Stay safe and browse privately with our VPN guides!


![Wireguard Android Client Setup [2022] - Simple and Secure VPN Wireguard android setup](https://www.smarthomebeginner.com/images/2021/09/wireguard-android-setup-header.webp)
![8 Amazing Raspberry Pi Ideas [2022]: Beginners and Enthusiasts Raspberry Pi ideas](https://www.smarthomebeginner.com/images/2021/09/raspberry-pi-4-dev-board.jpg)
