AdGuard Home has been gaining in popularity as a viable alternative to Pi-Hole. In fact, we did a detailed comparison of AdGuard Home vs Pi-Hole and gave AdGuard Home a slight edge.
In addition, of the nearly 1,700 readers who took our poll, 67% of them picked AdGuard Home as their choice.
We have covered Pi-Hole setup on Raspberry Pi in great detail. We think AdGuard Home Raspberry Pi setup deserves similar attention. So here is our ultimate Raspberry Pi AdGuard home guide.
For other platforms, checkout our AdGuard Home Ubuntu guide and AdGuard Home Docker guide.
Important Note
We debated a lot before writing this guide. Ad blockers are detrimental to content creators (including this website) as typically all ad revenue will be wiped out. Therefore, if you decide to install PiHole on Raspberry Pi for Ad Blocking, please consider supporting us by becoming a member for as low as $2 per month.
Table of Contents
- What is AdGuard?
- How to Setup AdGuard Home on a Raspberry Pi?
- Configuring devices to use AdGuard Home
- AdGuard configuration and customization
- AdGuard Tweaks
- Membership Required
- Troubleshooting
- FAQs
- AdGuard Tutorial - Closing Thoughts
What is AdGuard?
AdGuard offers various ad-blocking and privacy solutions. The number of options can be overwhelming, so we broke down the major AdGuard products for you. AdGuard Home is just one of them.
How does AdGuard work?
AdGuard Home provides free custom DNS for ad-blocking on your server. In essence, it is similar to Pi-Hole in offering private whole-home/network DNS level adblocking (all DNS requests that point to known ad servers are dropped).
It uses DNS filtering to block entire domains. When DNS requests match filter list rules, they're directed to a "blackhole," preventing unwanted data packets. AdGuard encrypts DNS requests, protecting against eavesdropping and hijacking, while also identifying and redirecting device requests to ad-related domains.
Once you have AdGuard Home running, there's no need to purchase a AdGuard DNS privacy subscription, as you can achieve the same level of protection. This AdGuard Home Raspberry Pi tutorial will help you set up an AdGuard ad-blocking DNS server and explore remote connections to AdGuard Home.
AdGuard Home Alternatives
If you only want alternative DNS privacy, there are many options you could choose over AdGuard Home.
How to Setup AdGuard Home on a Raspberry Pi?
To setup AdGuard Home on Raspberry Pi, you must install it to a device such as the Raspberry Pi and configure for your devices either individually or on the router for network-wide protection.
This guide is tailored for Raspi OS or Ubuntu/Debian-based Linux distros. In addition, we will also cover an alternate installation method using AdGuard Ubuntu appliance for Raspberry Pi.
The Raspberry Pi is ideal for many things, and AdGuard Home was designed to be installed on Pi and other singleboard computers. There are many other singleboard computers similar to the Pi also capable of running AdGuard. So, don't feel bad if your device is not a Pi, you can still follow this guide.
AdGuard Raspberry Pi Alternative - Linux mini-PC
The Raspberry Pi excels for smart homes and IoT due to its extensive hardware and software support. However, if your Pi primarily serves as a DNS server, you might underutilize its potential.
A powerful Pi can run additional software alongside AdGuard for DNS filtering without resource conflicts. If you're not into tinkering or IoT, consider a mini-PC running Linux as an alternative to a Raspberry Pi.
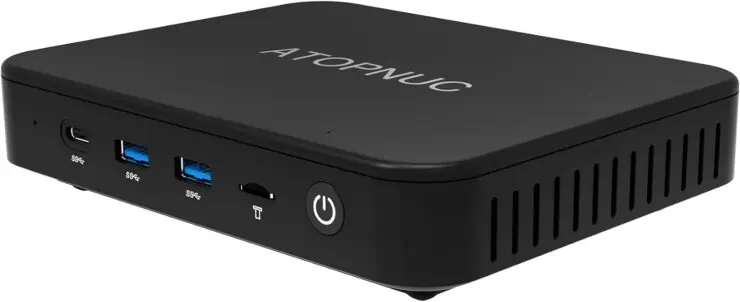
ATOPNUC is a good option for less than 100 USD. Just disable booting desktop and turn of sleeping, and you have yourself a lost-cost, low-power, unit.
Now that we have covered AdGuard Home alternative options and hardware let us get started with the Raspberry Pi AdGuard tutorial.
Adguard Home Raspberry Pi Setup Using the Commandline Installer
Step 1: What is needed to run AdGuard Home?
Here is what you will need to follow this AdGuard Raspberry Pi tutorial successfully.
- Raspberry Pi 4 - 2 GB version is the best Raspberry Pi for PiHole. Any version of Raspberry Pi, including older models, should work quite well for AdGuard purposes. We recommend this Raspberry Pi 4 kit, which comes with a power adapter, case, and heat sinks. A kit is cheaper than getting the items separately.
- SD Card - We use SAMSUNG PRO Endurance 64GB MicroSDXC Memory Card.
- Raspberry Pi 4 Power Supply (USB-C) - This is already included in the kits listed above. Don't skimp on the power adapter. A bad one can ruin SD cards, causing other problems.
- Ethernet Cable - Although you can use Wi-Fi, we strongly recommend a wired connection for reliability since all your network DNS requests will depend on this.
You will need access to a keyboard and monitor to connect your Raspberry Pi temporarily for setup. You can also use SSH for remote setup, which may add some time to the setup process. [Read: 15 most used SSH commands for Raspberry Pi – SSH for Raspberry Pi]
Step 2: Install Base OS - Raspi OS Lite
Once you have Raspberry Pi and accessories, move on to setup the base operating system for AdGuard. There are several that you can use, but we recommend Raspberry Pi OS Lite, which is headless and uses little resources.
Do not worry, although the OS is headless (no GUI desktop environment), you can still manage AdGuard using its web interface.
Install Raspberry Pi Imager
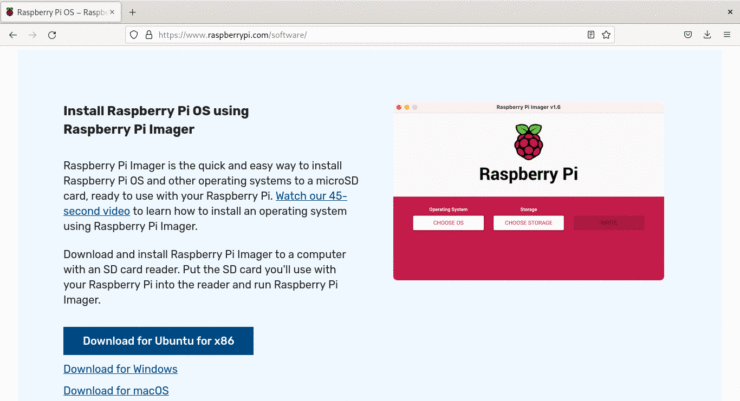
Head over to Raspberry Pi software page, download, and install the Raspberry Pi Imager.
Windows and MacOS installation of the Imager is straight forward. You download the installer and run it as any other package.
On Ubuntu, as of release 20.04 double-clicking no longer opens the .deb installer package with Software Center. You can either right-click on the .deb file, select Open with… and Software Install.
You can also use the command line, which is what I recommend. In this way, you can see what the issue is if it does not install. For me, it failed because of a dependency issue, but I was able to use the APT package manager to fix the issue.
You do not have to use Raspberry Pi Imager. Balena Etcher is also a popular option. [Read: 6 Best Raspberry Pi Imager Options and My Surprise Top Pick].
Install Raspberry PI Imager on Ubuntu
To install Raspberry Pi Imager on Ubuntu on the command line, use the dpkg command in the terminal app. If you are not logged in as user root, run sudo su and enter your password.
dpkg -i Downloads/imager_1.7.4_amd64.deb
To change into the Downloads/ directory use the cd command. This works on any Linux, Ubuntu, Debian and derivative distros as well. If you encounter an error that software dependencies are not installed, you can fix that using the APT package manager.
apt install -y -f --fix-broken
The -y option is to say "yes" to install the dependencies, -f is to "force" installation, and --fix-broken is to fix packages broken by the error. Then you can rerun dpkg -i to ensure it is fully installed, but the apt command should handle the rest.
Write Raspberry Pi OS Image to SD Card
Once installed, launch Imager. The screen will initially look like this.
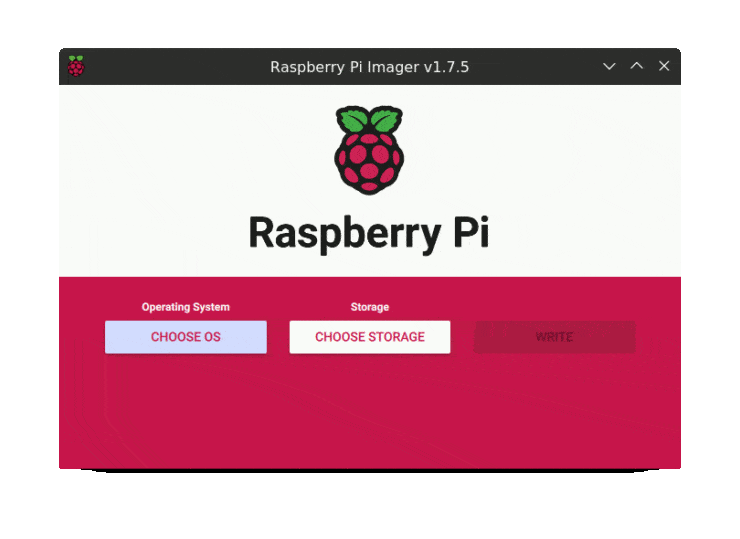
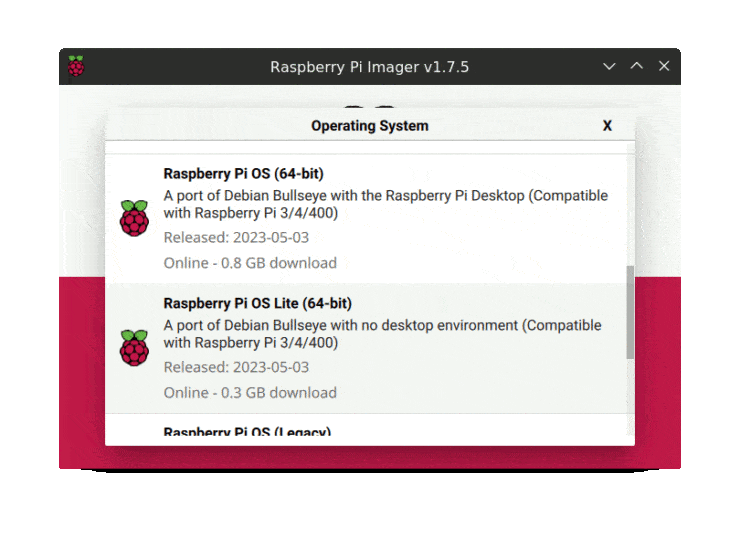
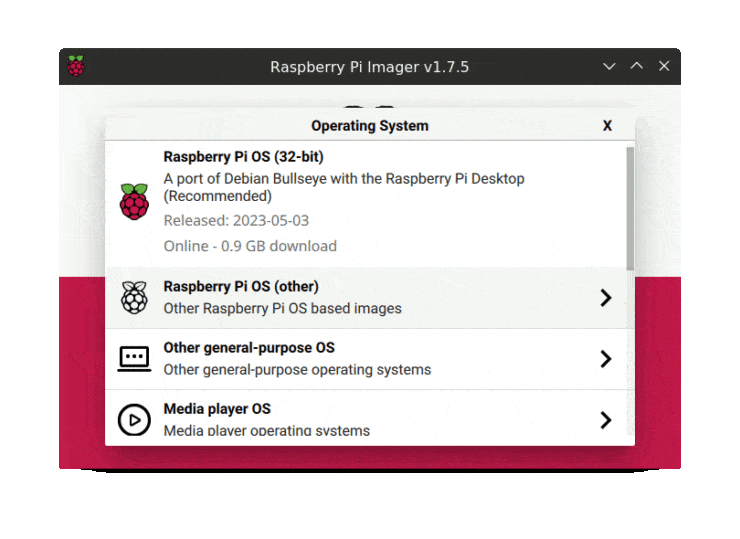
Choose the recommended OS, Raspberry Pi OS (32-bit ARM) Bullseye.
Here I choose Raspi OS Lite because I do not want a pre-innstalled desktop.
Configuring Raspberry Pi Imager Advanced Options
For me, on a Debian-based computer (Deepin or Depth OS), the gear icon normally in the bottom right-hand corner is not there (pictured above). On Ubuntu Studio it works normally. On a Windows computer, you can see the advanced settings option as shown below.
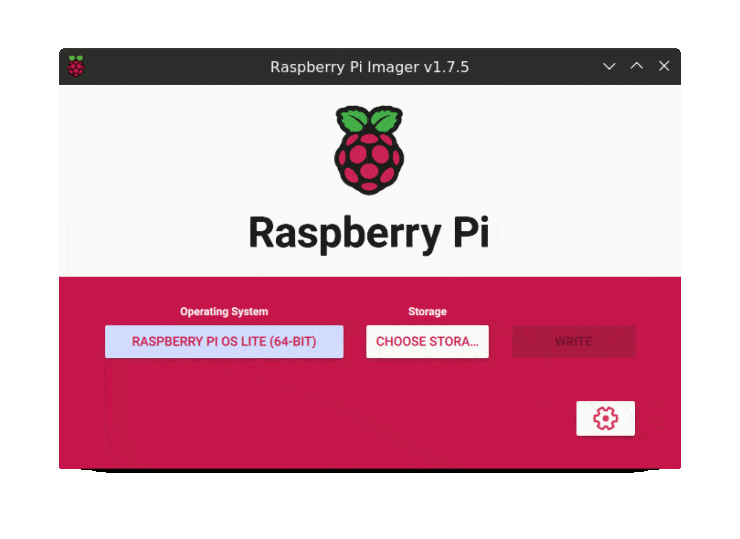
On some Linux distros (and older versions of macOS using newer versions of Imager), you might need to use CTRL+Shift+X to make advanced settings appear.
Enable SSH
For Raspberry Pi OS Lite, the advanced options allow you to boot and SSH in as the default user over Wi-Fi. This eliminates the need for a keyboard/mouse, monitor, and ethernet cable (still urged over Wi-Fi). Here we can set the hostname to "adguard" as well.
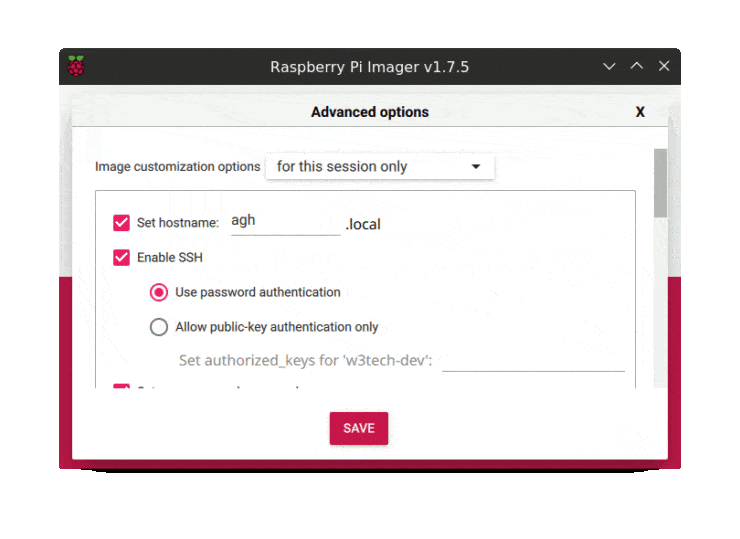
So, now creating an ssh.txt text file in the /boot directory only works if you have created a default user using Imager Advanced Settings (described below) or another way manually (not described in this guide).
Creating A Default User
You can enable user pi with a unique password in Imager at the same time you enable SSH, but it is NOT RECOMMENDED!
In an update to Raspberry Pi OS Bullseye the Raspberry Pi Foundation recommends you create a new default username and password, especially when enabling SSH on boot. This is what I am going to do.
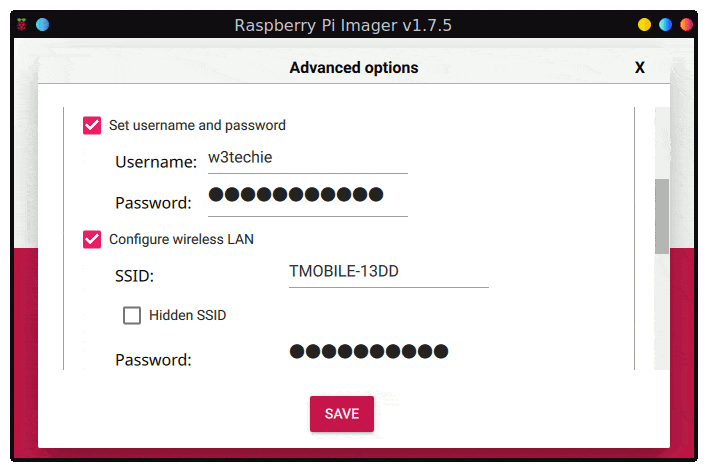
Finish Writing the Image
You can also configure Wi-Fi and locale in advanced options, but we will skip that part and use ethernet instead.
Next, choose the storage to install on. In this case, the microSD card.
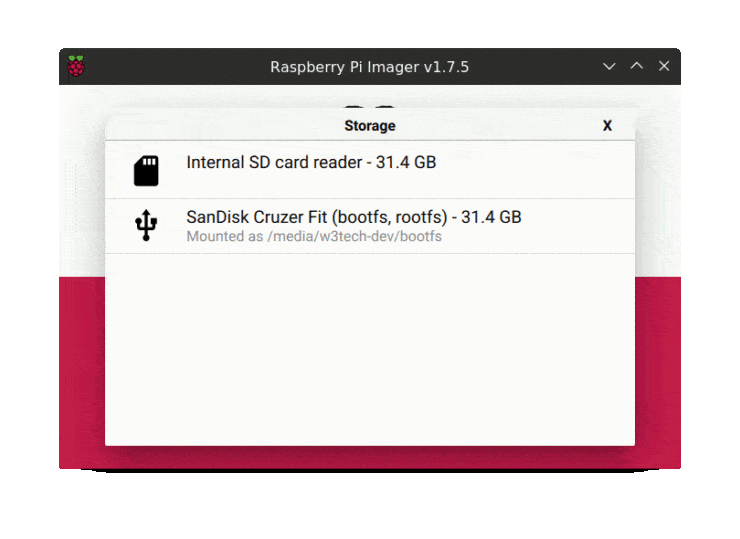
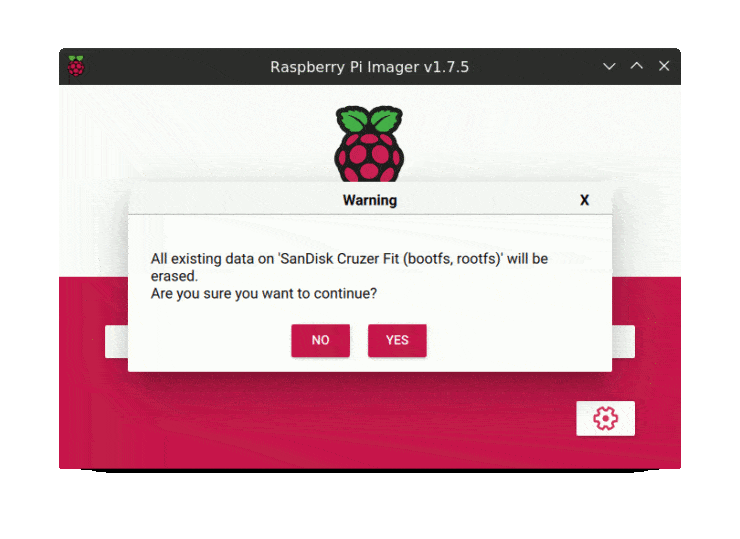
Continue to erase all data and write the Raspberry PI OS to external USB thumb drive.
Imager will tell you when it is done.
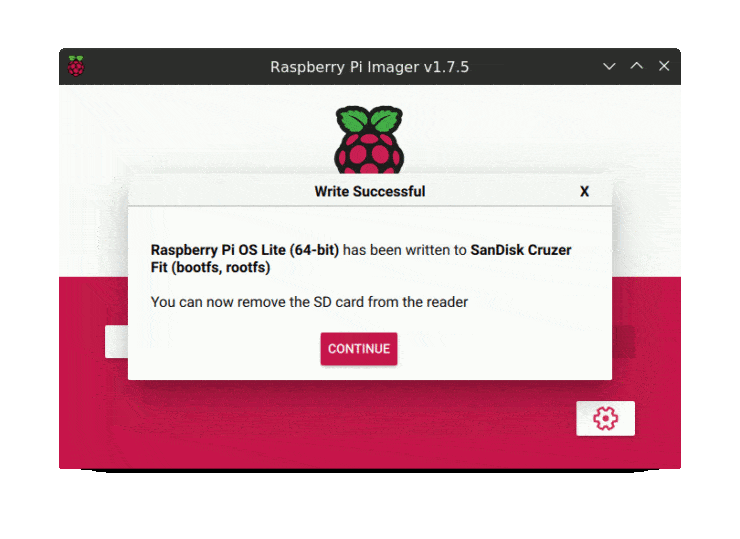
Now you can remove the SD card, pop it into the Pi, and boot it.
Be the 1 in 200,000. Help us sustain what we do.You will gain benefits such as Deployarr access, discord roles, exclusive content, ad-free browsing, and more.🔥 Holiday Sale! 25% Off Platinum Membership$399.99$299.99 (ends December 31).Join the Geek Army (starting from just $1.67/month)
Step 3: Configure Raspberry Pi OS
To start Raspberry Pi OS, insert the SD card into RPi, connect the Ethernet cable, and power it up. If you did not enable SSH and create a new user, then connect the Pi to a monitor and keyboard, create a new user when prompted, and continue with this AdGuard Home tutorial.
Step 3a: Enable SSH in raspi-config
You can now enable SSH by running:
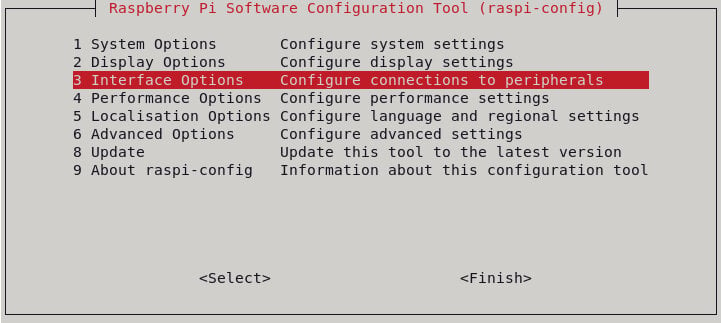
sudo raspi-config
Choose Interface Options from the menu.
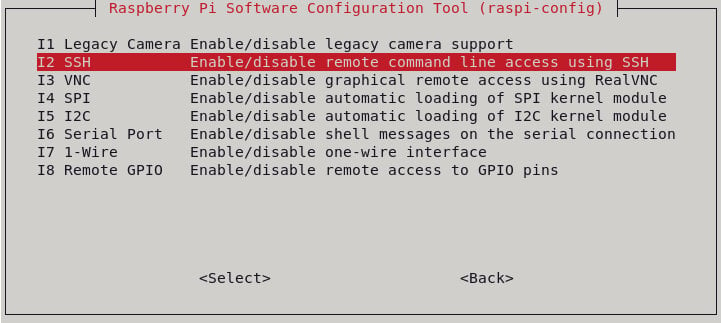
Choose SSH from the next menu screen.
The next screen will prompt you to confirm with "yes".
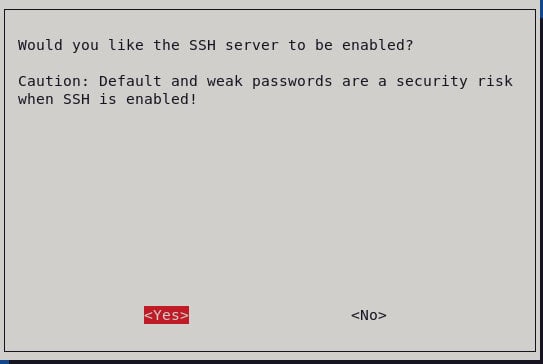
Now you can use SSH after Raspberry Pi OS boots. [Read: Best SSH clients for Android: 10 free SSH Apps for remote admin]
Step 3b: Raspberry Pi's Network IP
Login to your Wi-Fi router administration page, look through your list of connected clients and note down the IP address of your Raspberry Pi. In my case, it is 192.168.12.223.
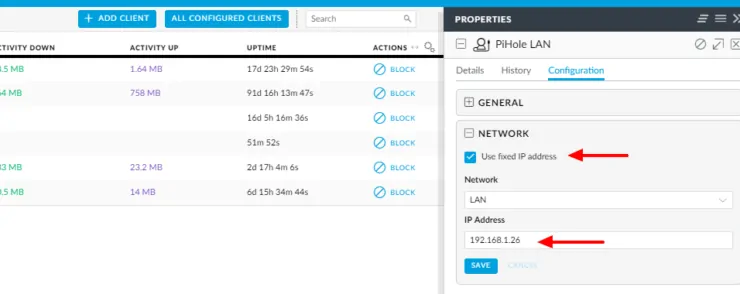
While you are there, set up a static IP for your AdGuard Raspberry Pi (this is required).
Most modern routers rarely change the IP addresses of connected clients. However, when it does happen your AdGuard instance will not be available and there is a good chance you may not have internet access as well.
The procedure to set static/fixed IP for clients vary by the router. Consult your Router documentation on how to set static IP for clients. The screenshot below shows how to do this on the UniFi controller.
Step 3c: Connect to AdGuard Through SSH
Once you have the AdGuard Home's IP address, use an SSH Client such as MobaXterm and connect to your Raspberry Pi through SSH using:
- IP Address / Host, which in this AdGuard Home guide is 192.168.12.223
- Port 22
Now you can use the new default username and password to login.
ssh [email protected]
Step 4: AdGuard Home for Raspberry Pi installation
Once logged in we use wget to download the latest stable release.
wget https://github.com/AdguardTeam/AdGuardHome/releases/download/v0.107.36/AdGuardHome_linux_arm64.tar.gz
Unpack it.
tar xvf AdGuardHome_linux_arm64.tar.gz
Change into the AdGuardHome directory.
cd ./AdGuardHome
Run the installer to install AdGuard Home on Raspberry Pi.
./AdGuardHome -s install
Once installation is completed you can access the setup wizard through AdGuard Home setup wizard's port 3000 using the IP address for the Raspberry Pi.
Ubuntu AdGuard Home Appliance (Alternate Installation Method)
Using the Ubuntu AdGuard Home Appliance on Raspberry Pi offers several benefits, including enhanced security and software support. Installation is straightforward: write the image to an SD card using Raspberry Pi Imager.
Download and Decompress AGH Ubuntu
First, we must download and decompress the AGH image from the Ubuntu appliances index using our old friend wget and the unxz command to decompress the .xz tarball.
wget https://cdimage.ubuntu.com/ubuntu-core/appliances/adguard-home-core18-pi.img.xz
unxz adguard-home-core18-pi.img.xz
Now we will launch Imager. Though I am using Imager on Ubuntu here, the process is virtually the same on Windows and macOS.
Only differences the methods to uncompress the down (e.g. using a utility such as 7zip on Windows) and the file browser for each operating system.
Burn Ubuntu AGH to SD
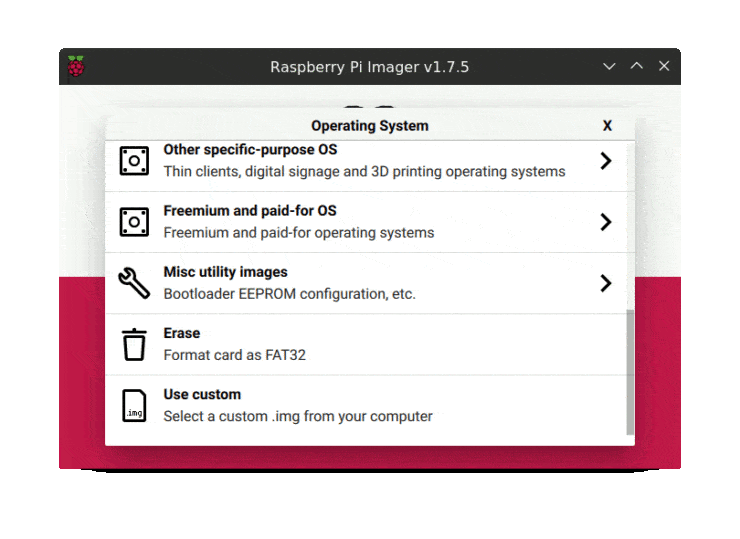
Open the downloaded image with Raspberry Pi Imager application, as a custom image (the last option).
Navigate to the folder where the image is stored.
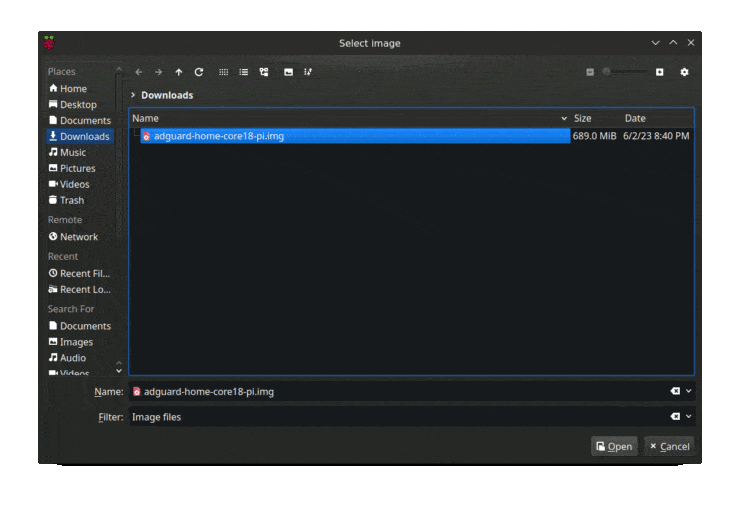
Select it and then choose the storage to install the image on as described above. In this case, I used an SD card, so it sees this as internal storage.
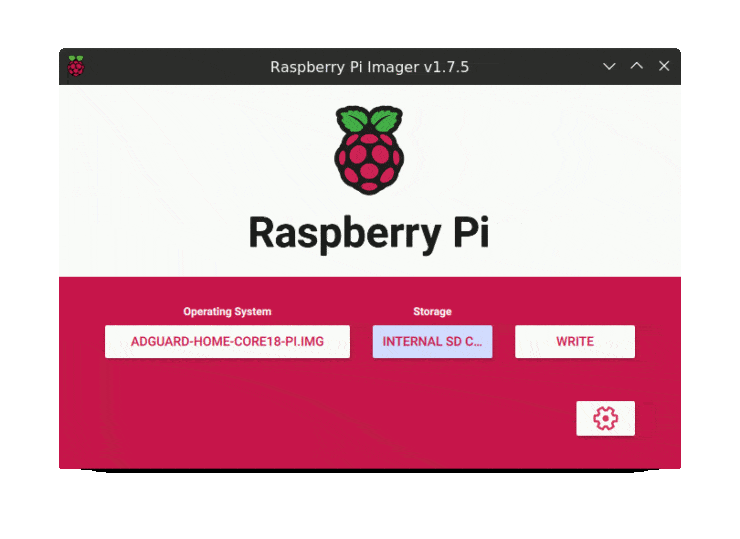
Hit the Advanced Settings gear icon.
Configure locale and time zone in Imager
We covered login, SSH and Wi-Fi already, but here we also set locale, time zone and keyboard layout. For me, the locale and keyboard layout need to be US. The time zone needs to be EST.

Then we hit Write and get the warning that all data will be erased as above. When it is though we get the write successful prompt the same as above. Now all you have to do is insert the SD into the Pi and boot to AGH on Ubuntu.
AdGuard Home Setup Wizard
To get to the AGH setup wizard navigate to 192.168.12.223:3000, where 192.168.12.223 is the IP address of my Pi.
Here we begin the setup process, which was also previously covered in our AdGuard Ubuntu guide.

Configuring Default Ports for AGH
Next, we set up the web interface port for administration, which is 80 by default.
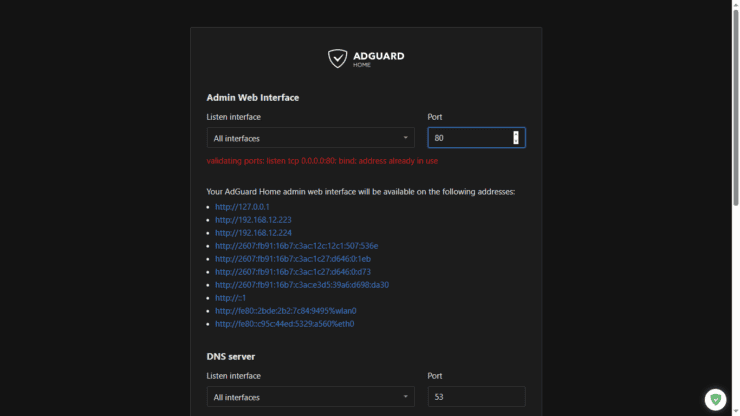
But, in my case port 80 is already in use by another application, so I can change the default from 80 to 8080.
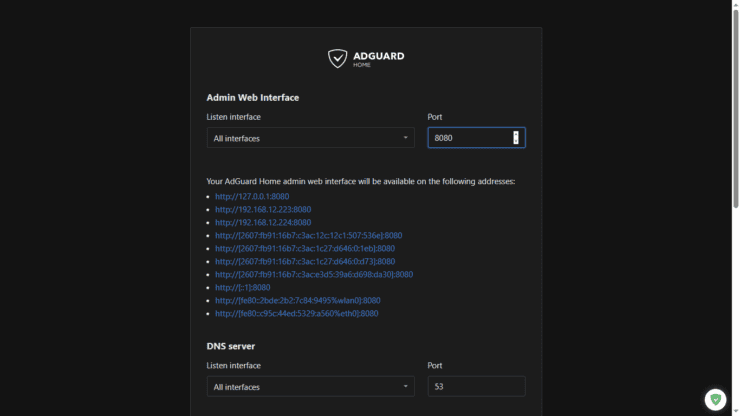
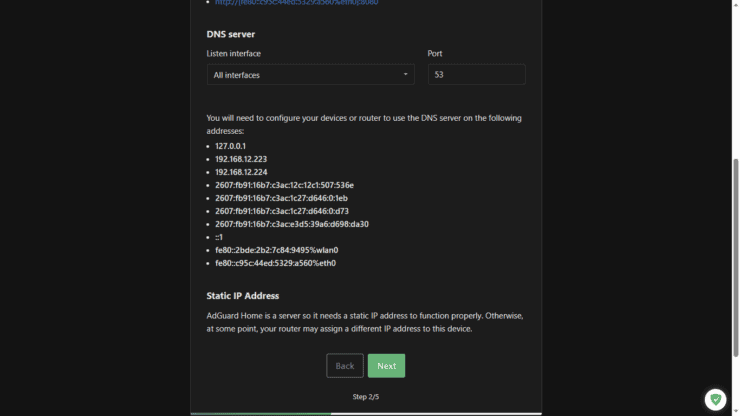
The DNS server uses port 53 by default. This is what you should always use.
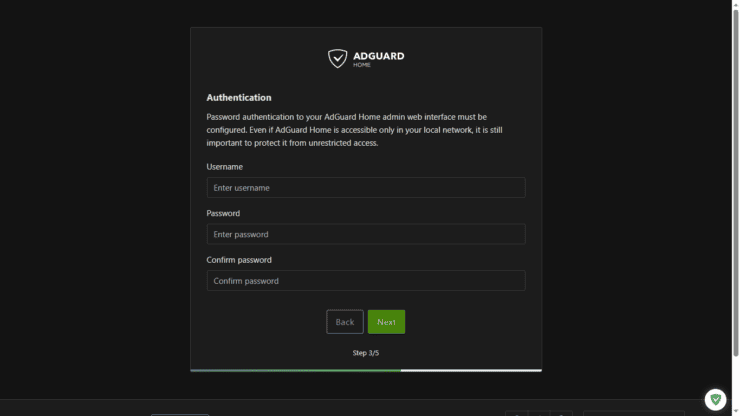
Creating a Username and Password
Now we create a username and password.
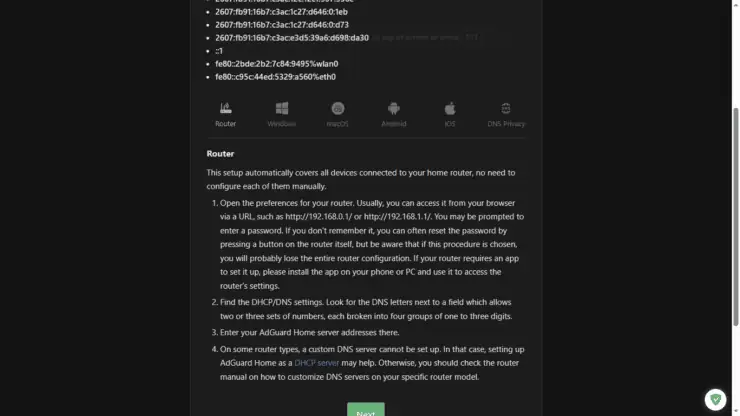
Private IPs and Setup Instructions
Now we are shown our private IP addresses and links to setup instructions for various platforms.
Congratulations! Open Dashboard
Now we receive congratulations and are prompted to Open Dashboard.

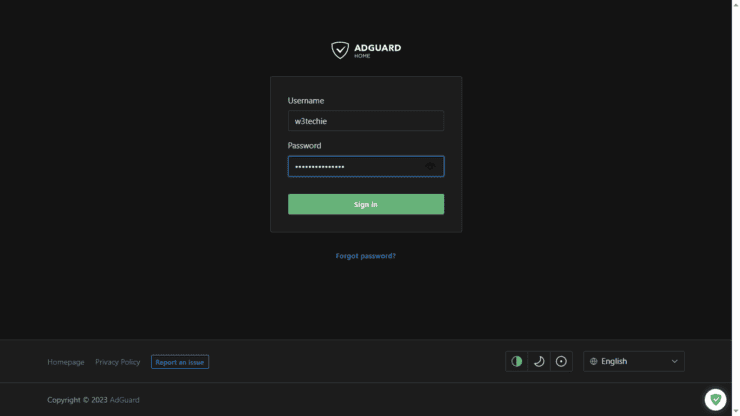
AGH Admin Web UI Dashboard Login
Then we see the dashboard login screen.
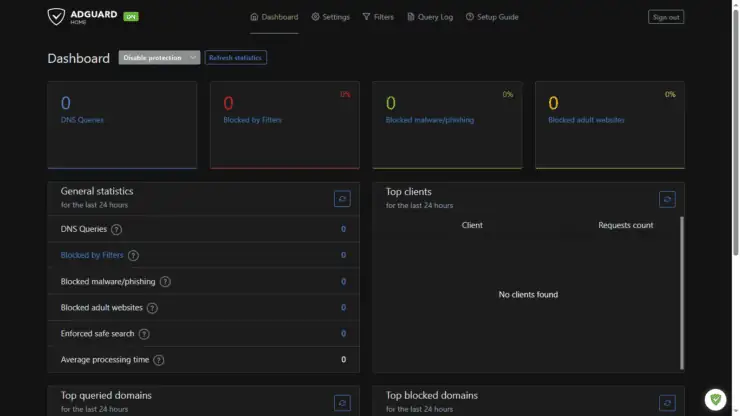
AGH Admin Web UI Dashboard
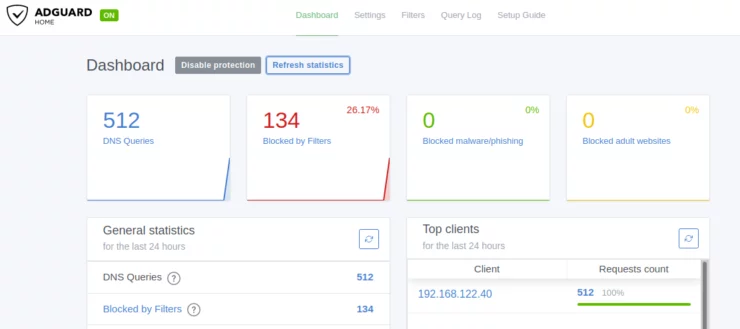
Here is a screenshot of the AGH Admin Web UI dashboard on first run.
AdGuard Home Initial Configuration
From the web interface, you now perform the initial configuration. We have already covered this in great detail:
Configuring devices to use AdGuard Home
Individual device or router-level AGH ad blocking: Router-level may affect some free content (e.g., TubiTV), so enable a guest network for such apps on streaming devices. Access router settings (varies by manufacturer) and forward port 53 to Pi's IP address (use ip addr show to find it). Works for both IPv4 and IPv6.
Important Note
We debated a lot before writing this guide. Ad blockers are detrimental to content creators (including this website) as typically all ad revenue will be wiped out. Therefore, if you decide to install PiHole on Raspberry Pi for Ad Blocking, please consider supporting us by becoming a member for as low as $2 per month.
Method 1: Configuring The Router for Whole-home Ad Blocking (Recommended)
To block ads on a network level (all network devices use Pi-hole as DNS) manually change or add your Pi-hole DNS server IP on your router as a DNS IP address.
Most routers allow manually setting DNS servers, but some do not make this advanced option available. You can try using custom router firmware to resolve this issue permanently.
Custom Router Firmware
Custom router firmware such as DD-WRT, OpenWRT, and Tomato, open up this option among several others. So if you do not see an option to change DNS name servers, consider switching to one of the supported free alternate router firmware.
The advantage to configuring your router to use Pi-hole for DNS is that there is only one place you will need to update your DNS server IP instead of each and every device. Another reason you might need to block DNS ads at the network level is that some devices do not even offer the option to change DNS settings.
Disadvantages of using AdGuard for DNS only
DNS ads are not all ads. For full ad-blocking you need a standard ad blocker as well. For instance, you can stream from your browser using an AdGuard ad blocking extension to a device capable of only using DNS. This allows you to use both because the ads are blocked by the browser by AdGuard extension app and DNS blocking is enabled on the device where you cannot install the app.
Solutions for per-host tracking or resolving hostnames
You may let your AdGuard Home handle DHCP instead of your router to overcome the limitations above: 1) visualize requests by host (per-host tracking) and 2) reach devices using their hostname.
Method 2: Configuring your devices (not recommended)
The procedure to manually set DNS servers will depend on the device and the operating system. This process is tedious and not recommended.
In addition, if your device leaves home (eg. mobile phones), you may not be able to connect to your AdGuard Raspberry Pi IP and therefore your internet won't work.
Typically, you will have to open the network connection and find the place to put in DNS server IP manually. Covering this is beyond the scope of this guide. Below are some external references for examples, where you can substitute your AdGuard Home Raspberry Pi IP address in place of public DNS IPs.
AdGuard configuration and customization
To configure AdGuard Home, you will have to access the web interface/dashboard.
How do I access AdGuard admin dashboard?
The AdGuard Admin dashboard or web interface can be accessed using a web browser with the URLs http://IP-ADDRESS:80 or http://agh.local. IP-ADDRESS is the Pi-hole server's local IP address (eg. 192.168.12.223 in this guide). Login using the password you created through the initial configuration wizard.
Configuring AdGuard
How to configure AdGuard? After initial configuration, there is not much more to configure.
One good customization to make is expanding or editing your blocklists. You can add blocklists from various online sources to enhance adblocking. These blocklists are trusted and you would rarely have any false positives.
Most AdGuard users may want to expand on blocklists (eg. for known malware/ransomware hosts). The AdGuard community is an excellent source of new information, and several users have created and continued to maintain custom expanded blocklists. Firebog Big Blocklist Collection is a notable one.
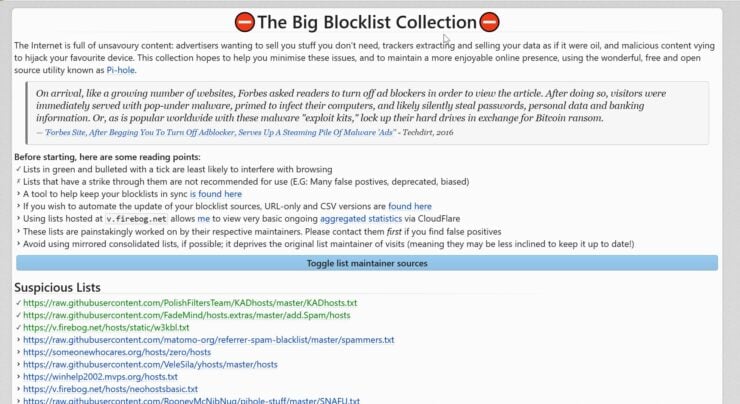
For detailed information about configuring blocklists for AdGuard, I highly recommend our guide on Top-5 Best AdGuard Home Configuration Tips.
Testing AdGuard Home?
AdGuard has services check page to tell you what you are running, if anything. If you are not running their apps, you will see an Install button for each app you don't have installed.
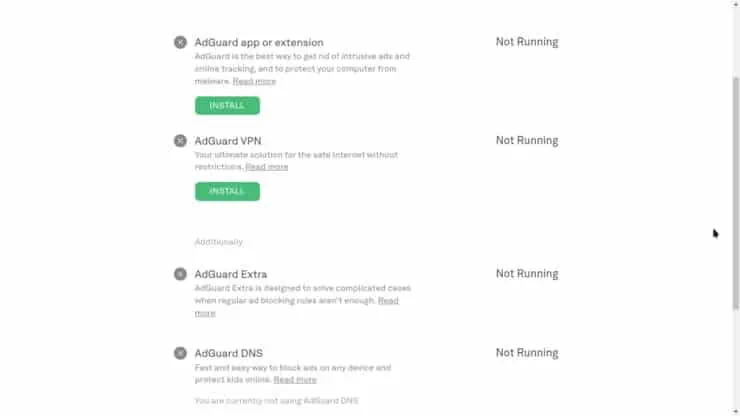
Another way to test how well your ad blocker is performing is with Toolz, which tests how many ads you are blocking. You can host Toolz yourself, if you are tech savvy. However, Toolz is also hosted online, if you want to test the apps you are currently using.
Basic AdGuard commands
When getting started with AdGuard it is helpful to know some of the basic commands.
AdGuardHome -s uninstall #Uninstalls the AdGuard Home service
AdGuardHome -s start #Start the service
AdGuardHome -s stop #Stop the service
AdGuardHome -s restart #Restart the service
AdGuardHome -s status #Show the current service status
To see all AdGuard commands, use --help.
./AdGuardHome --help
Installing AdGuard Home is just the beginning when it comes to establishing privacy. You can take more measures to further secure your setup. If your AdGuard Home server does more than provide private DNS, you may also want to take measures to improve the life and performance of your server device.
AdGuard Tweaks
Here are some AdGuard tweaks that can make your AdGuard setup even better.
1. Improving AdGuard Performance and Life
AdGuard Home cannot easily slow down the Pi, but a slow physical server can certainly affect AGH.
While a DNS server really does not have a great need for speed, the Raspberry Pi will decrease the longevity of a MicroSD card the more it writes to it. An ad blocker will assuredly write more often to the SD card than other applications.
In order to minimize this, you can either install the operating system on a USB jump drive instead or use Log2RAM to write to memory.
Move Query Logging to RAM
Enabling Rsync for Log2RAM
Log2RAM works on every Linux distro. If your Raspberry Pi is doing more than acting as a DNS server for AdGuard, you may have other reasons to increase performance. You can do this by installing Rsync and enabling it for Log2RAM by uncommenting the line USE_RSYNC=true in /etc/log2ram.conf.
You must install rsync as well.
apt install -y rsync
If Rsync is not enabled, Log2RAM will use the cp command to copy logs to RAM instead.
USB Boot AdGuard Home Raspberry Pi
For optimal performance when running an operating system on a Raspberry Pi, utilize a small-sized USB jump drive, preferably 32GB or less, as smaller drives read data faster due to reduced data volume. This speed advantage is particularly noticeable with standard hard drives featuring rotating spindles.
USB jump drives also boast higher durability compared to MicroSD cards, with the option of further increasing their lifespan using Log2RAM. My setup employs a flash drive as the primary hard drive, while the 8GB internal SD card serves as a configured swap partition, delivering even better results when combined with Raspberry Pi cases designed for solid-state drives.
An excellent USB thumb drive to buy is the SanDisk 32GB Ultra Fit USB 3.1 Flash Drive. If your Pi server needs even more performance, I recommend installing something like a Western Digital NVMe 250GB solid-state drive inside a compatible case such as the Argon ONE M.2 for Raspberry Pi 4 with SATA SSD support.
2. Improving Privacy
AdGuard Home is great for what it does, blocking ads. But your DNS servers (e.g. your ISP, Google, etc.) can and do sniff to find out what websites you are visiting (even the HTTPS sites). This is because DNS name resolutions (eg. google.com refers to this IP) are done as plain texts. In addition, this also poses some level of security risk.
DNS Over HTTPS
The solution here is to send even your DNS lookup through HTTPS protocol (encrypted). Not all DNS providers offer this (because they won't be able to track your activity). Cloudflare does provide DNS over HTTPS.
Setting up DNS over HTTPS with AdGuard is quite easy, if you follow the instructions in the AdGuard wiki by the AdGuard Team.
You must only configure client devices. Unlike Pi-Hole, AGH supports DoH out of the box. [Read: AdGuard vs AdGuard Home for Ad Blocking – 12 Key Differences]
How can I test if DNS over HTTPS is working?
Cloudflare has a test page that will provide information on your connection. Visit this page and it will tell you where you are connecting from, which DNS resolvers you are using, and whether the connection is secure or not.
Combine AdGuard with Unbound
I have AdGuard and DNS Over HTTPS, can I improve my privacy even more?
Yes, in the same manner as you would Pi-Hole. Take a look at configuring Unbound with Pi-Hole. Instead of trusting your upstream DNS (eg. Cloudflare's 1.1.1.1 or 1.0.0.1), Unbound, a recursive DNS resolver that will run locally, will connect to the responsible server directly.
This will avoid the exact path you are visiting from being logged anywhere.
Troubleshooting
Yandex browser and Samsung Internet mobile browser
Using AdGuard for Android on your smartphone, but still seeing ads? The AdGuard Content Blocker was developed for Yandex browser and Samsung Internet mobile browser to block ads without root permissions.
Hardcoded DNS
If you see ads on some devices and not on some then try rebooting your router first to renew DHCP leases. If you still continue to see ads, then the DNS server IP may be hard coded on the device (eg. Chromecast).
Some allow you to change it and some do not. Look through your device's network or DNS settings to check if you can change your DNS IP to your AdGuard's IP, or even better your internet gateway's IP (since you have already configured this to run through AdGuard).
No Internet
This happened when my SD cards failed. If you have no internet, make sure AdGuard is up and running by trying to SSH into it or opening the AdGuard admin dashboard. If not, try restarting Raspberry Pi by pulling the power.
Another option is to restore your DNS server IPs on the router/device back to the upstream DNS IP (1.1.1.1 and 1.0.0.1 for Cloudflare or leave them blank to use your ISP's DNS). If the internet works, then the problem is with the AdGuard setup. You may try to reconfigure using the AdGuardHome -s restart command.
FAQs
How do I set up AdGuard Home on Raspberry Pi?
The easiest AdGuard Home Raspberry Pi installer to use is the official Raspberry Pi Imager. Imager allows you to easily install Raspberry Pi OS and run the AdGuard Home installation script. [Read: AdGuard Home Docker Compose: No Ads + Privacy in 5 min]
Which Raspberry Pi is best for AdGuard Home?
Any Raspberry Pi is capable of running AdGuard Home because a DNS server uses very little hardware to respond to queries. By way of comparison, on an OpenWrt router AGH hardware requirements are a minimum of 50MB free RAM and 100MB free disk/flash space.
What should I run AdGuard Home on?
Using AGH on a Raspberry Pi Zero is one suggestion, because it only requires minimal hardware. A home DNS server does not need to be a robust, high-end server. Any dev board or old mini-PC should work.
Is AdGuard a Russian company?
AdGuard was founded in 2009 in Moscow. Later they moved their headquarters to Cyprus as a "conscious decision", in order to operate under the EU law.
AdGuard Tutorial - Closing Thoughts
AdGuard proves to be an excellent choice for maintaining an ad-free online experience while safeguarding against invasive content from advertisers infiltrating your data stream, requiring minimal effort to set up and maintain.
As mentioned earlier in the post, nearly 67% of the users prefer AdGuard Home over Pi-Hole, and it is no surprise that we give AdGuard Home a slight edge over Pi-Hole in our comparison.
The real reward becomes evident as tailored ads recede, offering a fresh perspective on product discovery and alleviating the monotony of being inundated with the same targeted offerings.
I strongly recommend trying AdGuard Home on Raspberry Pi to improve your internet experience.




![8 Amazing Raspberry Pi Ideas [2022]: Beginners and Enthusiasts Raspberry Pi ideas](https://www.smarthomebeginner.com/images/2021/09/raspberry-pi-4-dev-board.jpg)
![Top-5 Best AdGuard Home Configuration Tips [2022] AdGuard Home Banner](https://www.smarthomebeginner.com/images/2022/04/AGH-toptips.webp)