This post describes how to add post pagination in Genesis Theme Framework without a plugin and style it using CSS. Most bloggers know that splitting posts into pages is one way of increasing pageviews, decreasing bounce rate, and increasing CTR. StudioPress's Genesis Theme Framework offers some of the professionally designed WordPress themes and templates. Impressed with its features and customizability, we moved htpcBeginner to Genesis Theme Framework in June 2012. Since moving to Genesis, our traffic has continually increased. Of course, we made other improvements as well but premium paid themes do have several benefits that will help your site in the long run. While most Genesis theme customizations are fairly easy, some require a bit of work. One such task is adding post pagination. If you prefer to add post pagination using a plugin instead, check this post.
Table of Contents
You may also like to read:
Paginating Posts
Genesis Theme Framework supports post page numbers by default. You do not have to mess with any codes. All you have to do is add <!--nextpage--> at the point where you want to split your post. See the example below:
First page contents

<!--nextpage-->

Second page contents

<!--nextpage-->

Third page contents
Really, adding post pagination is that easy.
Styling Post Page Numbers
Now comes the difficult part. Regular WordPress themes have plugins such as WP-PageNavi and WP-PageNavi Style that work out of the box. These plugins do not work in Genesis Theme Framework out-of-the-box. Don't worry. You do not need them and it is extremely easy to style your post page numbers. A post with multiple pages by default looks like this in a Genesis Child Theme:
As you can see, it is plain without any styling. To style it, edit style.css file in your theme folder (usually /wp-content/themes/ThemeName). Post pagination is styled using the class pages. Add the following styles for the class pages:
/*The section below styles the whole post page numbers area*/
.pages
{
font-size:12px;
display:block;
clear:both;
padding: 3px 0 5px 5px;
}

/*The section below styles the post page number links and visited links*/
.pages a,
.pages a:link,
.pages a:visited,
.pages a:active {
    padding: 4px 8px !important;
    margin: 3px !important;
    text-decoration: none !important;
    border: 1px solid #C8C8C2 !important;
    background: #FCFCFC !important;
    box-shadow: 0 0 3px rgba(0, 0, 0, 0.1) !important;
    color: #0088B3 !important;
}

/*The section below styles the post pagination link while hovering mouse over over it*/
.pages a:hover {
    border: 1px solid #a7a7a3 !important;
    color: #fff !important;
    background: #0088B3 !important;
}
For Genesis 2.0.2 (HTML5) replace .pages with .entry-pagination.pagination (see comment).
It helps greatly if you already know a little bit of CSS. The names are self explanatory. Colors are specified in hexadecimal codes. Borders, padding, and margin are specified in pixels (px). You can use this site as good reference and play with various settings.
Recommended Guides on WordPress:
The above code styled my post page numbers as shown below:
Manually Adding Post Pagination to Your Theme
By default the post page numbers are shown below the post on the left side. Manually adding pagination function to your theme provides you more control over how and where the post page numbers are displayed. This requires a bit of knowledge on WordPress theme structure and PHP. First you will have to remove the default post pagination that is displayed after content to the left side. To do that, add the following code to the functions.php file in the child theme folder.
//Remove Default Post Pagination
remove_action( 'genesis_post_content', 'genesis_do_post_content_nav' );
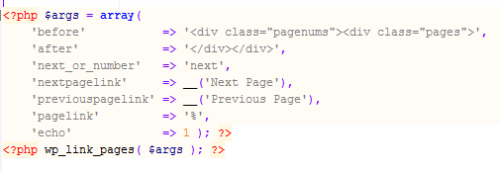
Then, you can display post pagination in the location of your choice by including the following PHP code:

Instead of numbers, if you would like to display "Next Page" and "Previous Page" as shown in the picture below:

Then, use the following PHP code, instead of the one above:

One way of adding pagination to your theme is by editing the post.php in Genesis Parent Theme (themes/genesis/lib/structure), at the location of your choice. This requires some PHP knowledge to control the appearance location and to not break your theme. An example is shown in my other post, which also shows how to insert custom affiliate banner or content between post content and post pagination. Keep in mind that any changes made to the parent theme files will be lost during Genesis update. Therefore, this is not the recommended way of adding post pagination.
Recommended Guides on WordPress:
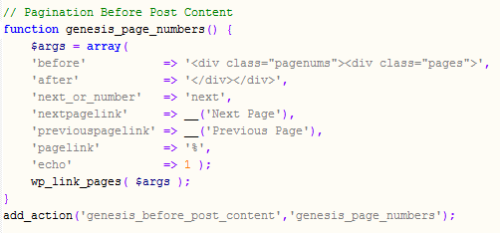
The second and the recommended method is using Genesis Theme filters and hooks. You could use one of the several built-in hooks. To add post page numbers before post content, open the functions.php file located in your child theme folder and add the following PHP code:

You may change the location of the page numbers by changing genesis_before_post_content hook. Save and exit. You should now see the page numbers on your post.
If you think this is complicated, try post page numbers with a plugin instead. Hope this helps! Go ahead and add post pagination to your site to increase pageviews.


