Don't like to outsource your authentication for Docker Traefik stack to third-party services like Google OAuth? Then this Docker Authelia tutorial is for you. Authelia is a self-contained and local authentication layer for Docker services.
As you may know, I am a big fan of Docker and Traefik for various services. [Read: 60+ Best Docker Containers for Home Server Beginners 2023]
Over the last few months, I have been working to improve the security of my Docker services.
A few months back, we showed you how to put your docker apps behind Google OAuth 2 authentication. I liked Google OAuth 2.0 and I rarely had to login because I am usually logged into my google account on Chrome.
I never really had any issues using Google OAuth but the thought of using my private authentication layer that is open-source fascinated me. Authelia is now a key component protecting my smart home setup and it also protects this Docker-based WordPress site. I am quite happy with it.
So, in this Authelia guide, I will show you how to setup Authelia on Docker and how to put your services that are behind Traefik on Authelia authentication.
Table of Contents
Authelia Background Information
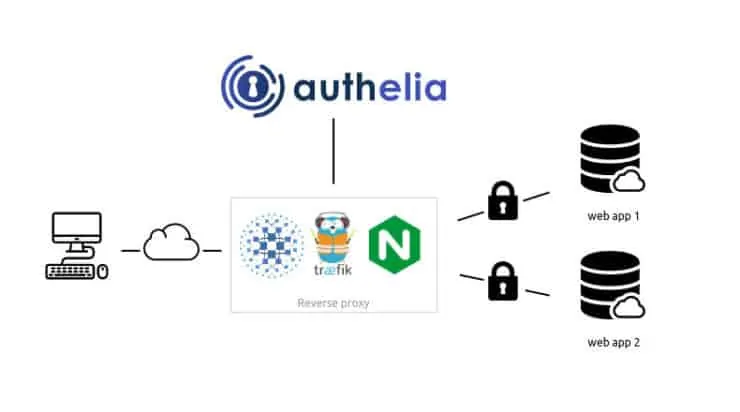
Authelia is an open-source authentication and authorization server providing 2-factor authentication and single sign-on (SSO) for your applications via a web portal. It acts as a companion of reverse proxies like Nginx, Traefik, or HAProxy to let them know whether queries should pass through. Unauthenticated users are redirected to the Authelia Sign-in portal instead.
The schematic below shows how Authelia fits into the grand scheme of things.
Detailed information is available on Authelia's GitHub page and its Documentation.
Authelia Features
Here are some key features of Authelia:
- Several kind of second factor:
- Security Key (U2F) with Yubikey.
- Time-based One-Time password with Google Authenticator.
- Mobile Push Notifications with Duo.
- Password reset with identity verification using email confirmation.
- Single-factor only authentication method available.
- Access restriction after too many authentication attempts.
- Fine-grained access control per subdomain, user, resource and network.
- Support of basic authentication for endpoints protected by single factor.
- Highly available using a remote database and Redis as a highly available KV store.
Types of Authelia Deployment
Authelia supports three scenarios:
- Local: Meant to be used for scenarios where the server is not be exposed to the internet. Domains will be defined in the local hosts file and self-signed certificates will be utilized. This is useful for testing.
- Lite: Authelia Lite is for scenarios where the server will be exposed to the internet with proper domains, DNS, and LetsEncrypt certificates. The Lite element refers to minimal external dependencies; File based user storage, SQLite based configuration storage. In this configuration, the service will not scale well.
- Full: Authelia full, is similar to Lite but with scalable setup which includes external dependencies; LDAP based user storage, Database based configuration storage (MariaDB, MySQL or Postgres).
In this guide, we are going to use Authelia Lite. However, we are going to also make it slightly scalable with Redis and MySQL configuration. Only LDAP user storage is not covered here.
Authelia Alternatives
Are there alternatives to Authelia? Sure. There is even a well-established open-source alternative.
We already discussed Google OAuth. Another wonderful and open-source Authelia Alternative is Keycloak. Keycloak has a huge following.
Authelia vs Keycloak
I have personally not administered Keycloak but have used it and spoken to others that administer it. I have been using Authelia for several months. In my limited knowledge, my opinion is that Authelia is a lot simpler to administer and use than Keycloak for protecting Docker services. Authelia has also met all my needs so far.
Combined with Cloudflare settings for Docker and Docker Security best practices, Authelia has significantly enhanced the security of my setup.
Let us now dive into configuring Authelia.
Authelia Configuration
That's right. We are going to starting with configuring Authelia before setting it up. Authelia needs some basic configuration to be done before the Authelia docker service can start properly.
Requirements
Before we get started with Authelia docker configuration, ensure that you have read and followed my previous Docker Traefik guide. You should have a working Traefik Docker stack with the Docker root folder defined using the environmental variable $USERDIR.
In the docker root folder, in my case /home/user/docker, create a folder called authelia. With that done, let us begin configuring Authelia.
1. Authelia "Required" Configuration
Authelia configurations are defined in configuration.yml. Some are required and some are optional. So begin by creating an empty configuration.yml file and add content to it as defined below.
At any point, you may refer to Authelia Documentation to further customize your setup.
Basic Configuration
First, let us add the basic info shown below.
###############################################################
#                   Authelia configuration                    #
###############################################################

host: 0.0.0.0
port: 9091
log_level: warn
The defaults above should work for most Docker Authelia setups. When creating bypass rules or troubleshooting, you may change the log_level to debug, trace, or info.
Next, let us add jwt_secret. I started out by defining the secret in configuration.yml but later moved to using Docker secrets for improved security. If you prefer to add it here instead, you may create one using this website, uncomment jwt_secret line ,and replace SECRET_GOES_HERE.
# This secret can also be set using the env variables AUTHELIA_JWT_SECRET_FILE
# jwt_secret: SECRET_GOES_HERE # use docker secret file instead AUTHELIA_JWT_SECRET_FILE
Then, add the following lines:
# https://docs.authelia.com/configuration/miscellaneous.html#default-redirection-url
default_redirection_url: https://authelia.example.com
Replace example.com with your domain name.
Time-Based One Time Password Configuration
Authelia uses time-based one-time-passwords (TOTP). Let us configure that next:
totp:
  issuer: authelia.com
  period: 30
  skew: 1
The details for above settings are here. However, it is highly recommended not to mess with these.
Authentication Backend
Next, let's add the Authelia authentication backend. We are going to use file-based authentication with one of the strongest hashing algorithms for passwords (argon2id).
authentication_backend:
  file:
    path: /config/users_database.yml
    password:
      algorithm: argon2id
      iterations: 1
      salt_length: 16
      parallelism: 8
      memory: 1024 # blocks this much of the RAM. Tune this.
We are going to store user information in users_database.yml file, which we will create later.
For passwords, argon2id is the recommended hashing algorithm. You may choose to use sha512 (recommended for low power devices). The defaults shown above for iterations, salt_length, parallelism, and memory should work for most instances.
You may customize them based on this documentation. Note, that customizing the values will have a huge impact on resource usage.
Access Control
Next, let us add access control configurations.
access_control:
  default_policy: deny
  rules:
    - domain: authelia.example.com
      policy: bypass
    - domain:
        - "*.example.com"
        - "example.com"
      policy: two_factor
Replace example.com with your domain name. You may leave the rest of the lines as-is to start. By default, we are deny access for anything, bypassing authentication for authelia.example.com. Everything else will require two-factor authentication.
You have the flexibility to bypass authentication for certain situations. For example, adding the block below to rules would allow you to bypass authentication while accessing services from your home network.
    - domain:
        - "*.example.com"
        - "example.com"
      policy: bypass
      networks:
        - 192.168.1.0/24
        - HOME-WAN-IP-ADDRESS
Refer to the authelia access control documentation for more ways to customize bypass rules.
Authelia Session Configuration
Next, we configure how authentication sessions are stored. Add the following block to your configuration.yml.
session:
  name: authelia_session
  # This secret can also be set using the env variables AUTHELIA_SESSION_SECRET_FILE
  # secret: SECRET_GOES_HERE # use docker secret file instead AUTHELIA_SESSION_SECRET_FILE
  expiration: 3600 # 1 hour
  inactivity: 300 # 5 minutes
  domain: example.com # Should match whatever your root protected domain is
We are going to define the session secret using Docker secrets as described later (more secure). But if you choose to, you can use the same method as for jwt_secret, generate a new secret and replace SECRET_GOES_HERE.
Replace, example.com with your domain name. The rest can be left to default or customized to have longer or shorter session intervals. Shorter intervals will result in more frequent multi-factor authentication.
You can further enhance the performance of session storage by using a database backend and Redis as described later. But this is optional and improvements are marginal in a single-user environment.
Regulation
Authelia has built-in brute-force protection from malicious attacks. To configure that, add the following block.
regulation:
  max_retries: 3
  find_time: 120
  ban_time: 300
More information on regulation can be found here. The above configuration would ban any user that has 3 incorrect logins in 120 seconds (2 min), for a ban length of 300 seconds (5 min).
Session Storage
Authelia has built-in session storage using SQLite. This is sufficient for single-user environment.
Add the following block to configuration.yml:
storage:
  local:
    path: /config/db.sqlite3
Replacing SQLite with a database such as MySQL (described later) offers performance, scalability, and the ability to run multiple authelia instances.
Authelia Notifications
The last bit of required configuration is notifications, which can be via emails or text files. To start, let's keep it simple and save all notifications in a text file called notifications.txt.
notifier:
  # For testing purposes, notifications can be sent in a file. Be sure to map the volume in docker-compose.
  filesystem:
    filename: /config/notification.txt
Be sure to create an empty file called notification.txt inside the authelia folder (/home/user/docker/authelia).
2. Authelia Optional Configuration
Some optional Authelia configurations offer convenience and performance improvements. We will look at those next in this Authelia tutorial.
Redis
In simple terms, Redis is a key-value caching mechanism that can enhance the performance of applications that access databases frequently. If you do not have Redis, it is quite easy to have it up and running with Docker. Check my GitHub repo files for the Redis docker-compose.
If you have a Redis instance available add the following block under session: to activate the usage of Redis (pay attention to indentation).
  redis:
    host: redis
    port: 6379
    # This secret can also be set using the env variables AUTHELIA_SESSION_REDIS_PASSWORD_FILE
    # password: authelia
Customize the host with the host running Redis. The port is typically 6379. The use of a password is optional. Again, in a non-busy system, using Redis will have minimal impact. But I already use Redis for other applications so adding it was easy for me.
MySQL Storage
Authelia offers several storage backends. In this example, let us use MySQL. Add the following block under storage:, paying attention to the indendation.
  mysql:
    host: MYSQL_HOST
    port: 3306
    database: authelia
    username: DBUSERNAME
    # Password can also be set using the env variables AUTHELIA_STORAGE_MYSQL_PASSWORD_FILE
    # password: PASSWORD_GOES_HERE # use docker secret file instead AUTHELIA_STORAGE_MYSQL_PASSWORD_FILE
Create a MySQL database called authelia and provide the connection details above. We can provide the password here or as a secret (described later).
If you use MySQL, be sure to comment out or remove the SQLite storage backend in the configuration.yml file.
Email Notifications
Storing notifications in a text file is not ideal. If you have an email server (I use and recommend Mailgun, which is free), you can enable email notification by adding the following block under notifier::
  smtp:
    username: SMTP_USERNAME
    # This secret can also be set using the env variables AUTHELIA_NOTIFIER_SMTP_PASSWORD_FILE
    # password: PASSWORD_GOES_HERE # use docker secret file instead AUTHELIA_NOTIFIER_SMTP_PASSWORD_FILE
    host: SMTP_HOST
    port: 587 # Or 465
    sender: SENDER_EMAIL
Replace the SMTP access details above. The password, once again, can be supplied as a secret or added here by replacing PASSWORD_GOES_HERE.
After enabling email notifications, you may choose to disable writing notifications to the notification.txt file (comment out or remove those lines).
3. Authelia Secrets
Storing Authelia using Docker secrets can enhance security. All the secrets supported by Authelia are listed here. Let us create the ones we used above.
Adding secrets to Docker is essentially a multi-step process, which I have described in detail in my Docker security checklist. But here is a brief process.
1. Create Secrets Folder
In the docker root folder, create a secrets folder. The folder must be owned by root:root and have 600 permission as shown below.

2. Create A Secret File
With the secrets folder created, let us create the secrets. Each secret value is a separate file inside the secrets folder. Here are the secrets I have created for Authelia.
Notice that they all have the same permissions (owner root, group root, and 600 permissions) as the secrets folder.
For example, let us create a secret for jwt_secret from Authelia's configuration.yml file.
First, gain root privileges using sudo su command so you can access the secrets folder. Then using your favorite text editor (I use nano), create a file called authelia_jwt_secret.
nano authelia_jwt_secret
Copy-paste the jwt_secret you created inside the file. There should be nothing else in the file except the secret. Save and close the file. Similarly, create all other secrets that are used in the configuration.yml file.
3. Add the Secret to Docker Globally
In your docker-compose file, add a section for secrets as shown below. Notice that the environmental variable $SECRETSDIR must be defined in the .env file. If you followed my Docker Traefik guide, then this should be /home/user/docker/secrets.
########################### SECRETS
secrets:
  authelia_jwt_secret:
    file: $SECRETSDIR/authelia_jwt_secret
  authelia_session_secret:
    file: $SECRETSDIR/authelia_session_secret
  authelia_storage_mysql_password:
    file: $SECRETSDIR/authelia_storage_mysql_password
  authelia_notifier_smtp_password:
    file: $SECRETSDIR/authelia_notifier_smtp_password
  authelia_duo_api_secret_key:
    file: $SECRETSDIR/authelia_duo_api_secret_key
If you have any questions on where exactly this is added, refer to the docker-compose files in my GitHub Repo.
I added it right above my services: block.
4. Add Secret to Authelia Service
After defining the secrets globally, you will have to make the service use them. To do so, you will have to add two pieces to your docker-compose snippet for the service:
- Secrets block within the service
- Environment variables within the service pointing to the secret files
This is shown in the Authelia Docker compose snippet later in this guide.
4. Authelia Users
There is one last piece of information that needs to be configured: Users. In our configuration.yml file we said users are in the users_database.yml file, which is described here.
In the /home/user/docker/authelia folder, create a file called users_database.yml add the following to it:
users:
  username:
    displayname: "John Doe"
    password: "HASHED_PASSWORD"
    email: [email protected]
    groups:
      - admins
      - dev
Customize the displayname and email.
To hash the password use the following command (you may have to use sudo in front):
docker run authelia/authelia:latest authelia hash-password YOUR_PASSWORD
Replace YOUR_PASSWORD with your strong password. Your password will be hashed using the argon2id algorithm and displayed as shown below.
Copy hashed password in its entirety (highlighted by red box) and replace HASHED_PASSWORD in the users_database.yml.
Save the file and exit.
Authelia Traefik Configuration
Now that Authelia configuration is done. Let us configure Traefik to use Authelia.
Building on the same framework we built using the Docker-Traefik guide, we need to add two sections to Traefik configuration: a middleware for authelia and a middleware chain for authelia.
The Google OAuth setup also uses a similar framework.
Authelia Traefik Middleware
First, let us create am Authelia Traefik middleware that will forward authentication to the Authelia container.
Add the following code block to your middleware. If you followed my Traefik guide exactly, this would be middlewares.yml.
    middlewares-authelia:
      forwardAuth:
        address: "http://authelia:9091/api/verify?rd=https://authelia.example.com"
        trustForwardHeader: true
        authResponseHeaders:
          - "Remote-User"
          - "Remote-Groups"
Replace, example.com with your domain. Nothing else to change.
Traefik Middleware Chain for Authelia
Next, create a new middleware chain and include rate limiting and security headers for additional security. To do this, add the following code block to middlewares-chains.yml:
    chain-authelia:
      chain:
        middlewares:
          - middlewares-rate-limit
          - middlewares-secure-headers
          - middlewares-authelia
The middlewares-rate-limit and middlewares-secure-headers middlewares are described in my Traefik docker guide. That is it for traefik configuration. Later in this guide, I will show you how to use these middlewares to put services behind Authelia Authentication.
Be the 1 in 200,000. Help us sustain what we do.You will gain benefits such as Deployarr access, discord roles, exclusive content, ad-free browsing, and more.🔥 Holiday Sale! 25% Off Platinum Membership$399.99$299.99 (ends December 31).Join the Geek Army (starting from just $1.67/month)
Authelia Docker Compose
Now that all the configuration part is done. Let us add the Authelia docker service.
With Traefik already up and running, add the following snippet to your docker-compose:
  # Authelia (Lite) - Self-Hosted Single Sign-On and Two-Factor Authentication
  authelia:
    container_name: authelia
    # image: authelia/authelia:latest
    image: authelia/authelia:4.21.0
    restart: always
    networks:
      - t2_proxy
    depends_on:
      - mariadb
      - redis
    volumes:
      - $DOCKERDIR/authelia:/config
    environment:
      - TZ=$TZ
      - AUTHELIA_JWT_SECRET_FILE=/run/secrets/authelia_jwt_secret
      - AUTHELIA_SESSION_SECRET_FILE=/run/secrets/authelia_session_secret
      - AUTHELIA_STORAGE_MYSQL_PASSWORD_FILE=/run/secrets/authelia_storage_mysql_password
      - AUTHELIA_NOTIFIER_SMTP_PASSWORD_FILE=/run/secrets/authelia_notifier_smtp_password
      - AUTHELIA_DUO_API_SECRET_KEY_FILE=/run/secrets/authelia_duo_api_secret_key
    secrets:
      - authelia_jwt_secret
      - authelia_session_secret
      - authelia_storage_mysql_password
      - authelia_notifier_smtp_password
      - authelia_duo_api_secret_key
    labels:
      - "traefik.enable=true"
      ## HTTP Routers
      - "traefik.http.routers.authelia-rtr.entrypoints=https"
      - "traefik.http.routers.authelia-rtr.rule=HostHeader(`authelia.$DOMAINNAME_SHB`)"
      ## Middlewares
      - "traefik.http.routers.authelia-rtr.middlewares=chain-authelia@file"
      ## HTTP Services
      - "traefik.http.routers.authelia-rtr.service=authelia-svc"
      - "traefik.http.services.authelia-svc.loadbalancer.server.port=9091"
Few notes on the Authelia docker-compose snippet:
- image: Notice that I am specifying Authelia version number to use explicitly (4.21.0 at the time of writing this guide). In my experience, there has been some breaking changes with Authelia development that made my services unavailable. So now, I check the breaking changes list and upgrade authelia manually.
- depends_on: I use MySQL and Redis for storage. These are defined as separate services in my docker stack and so the authelia container is dependent on those two. If one of them is down then Authelia will not work.
- volumes: Authelia container's /config volume is mapped to the Authelia folder in docker root. This folder contains configuration.yml, users_database.yml, and notification.txt.
- environment: As noted previously, adding secrets to services requires two more additions to the docker-compose snippet for the service. Under environment notice the list of secrets. These are defined as VARIABLE_NAME_FILE=/run/secrets/secret_file_name. The /run/secrets/ should be used as-is and the secret_file_name is the filename for secrets that we created in /home/user/docker/secrets folder, previously.
- secrets: This is the second section within docker-compose snippet where the secrets are listed. All filenames of secrets used in the service are listed here.
- labels: No changes are required here. We are using the authelia-chain middleware chain file we created previously.
Save your docker-compose, start the Authelia container, and check Authelia container logs. You should see an output that indicates that Authelia is listening on port 9091.

Putting Docker Services behind Authelia
If you created the authelia traefik middleware and middleware chain discussed above, then putting docker services behind Authelia authentication is simple. All you need to do is add the following middleware to docker-compose labels:
      ## Middlewares
      - "traefik.http.routers.service-rtr.middlewares=chain-authelia@file"
service-rtr could be different for different services. As always, check the docker-compose files in GitHub repo for working examples.
Putting Non-Docker Services behind Authelia
Adding non-docker apps or apps from docker host or external hosts is also quite simple. Check the Traefik rules folder in my GitHub repo for working examples.
The YAML example below shows how to put PiHole on an external host behind Authelia authentication. [Read: How to Run PiHole in Docker on Ubuntu, w/ and w/o Reverse Proxy?]
http:
  routers:
    pihole-rtr:
      rule: "HostHeader(`pihole.example.com`)"
      entryPoints:
        - https
      middlewares:
        - chain-authelia
        - pihole-add-admin
      service: pihole-svc
      tls:
        certResolver: dns-cloudflare
  middlewares:
    pihole-add-admin:
      addPrefix:
        prefix: "/admin"
  services:
    pihole-svc:
      loadBalancer:
        servers:
          - url: "http://192.168.1.26:80"
Note that PiHole is listening on a non-SSL port. [Read: How to Run PiHole in Docker on Ubuntu, w/ and w/o Reverse Proxy?]
Some services (eg. NextCloud, UniFi controller, etc.) need tcp routers instead of HTTP routers because they use self-signed certificates. [Read: How to Install UniFi Controller on Docker with Reverse Proxy (Traefik)?]
Authelia Usage
Now that Authelia Docker container is up and running. Let us test it out.
Authelia First Time Use and Registration
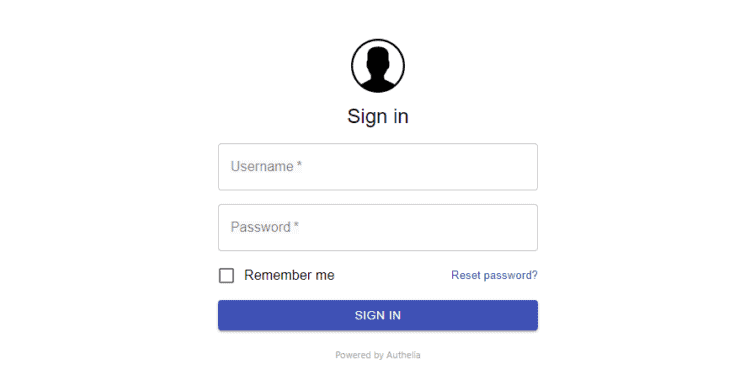
While accessing a service protected by Authelia, for the first time, you should see the following login form.
Log in using the username and password you defined in users_database.yml file.
Next, you will have to register your device. Click on Methods, choose One-time Password, and then click Not registered yet?, as shown below.
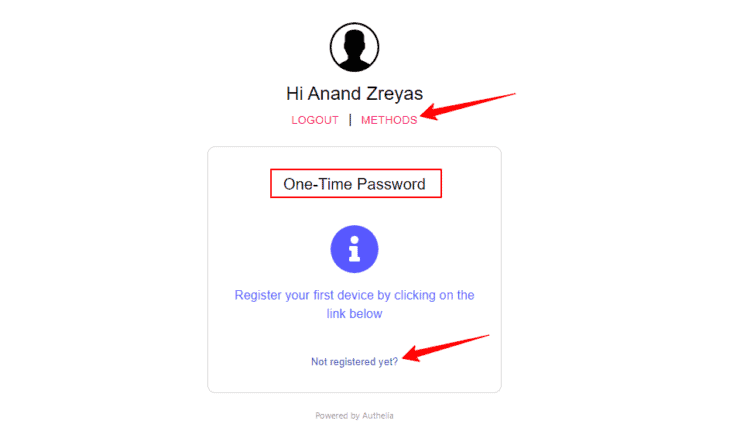
A registration link will be sent to the user's email ID defined in the users_database.yml file.
But there is one problem. What if you did not configure SMTP server for email notifications? Well, in that case, the registration link is embedded in the notification saved to notification.txt file.

You will have to find this link and open it in the same browser as the one where you are trying to access the service that is behind Authelia.
If you did configure SMTP for email notifications, then you should receive an email like what is shown below.
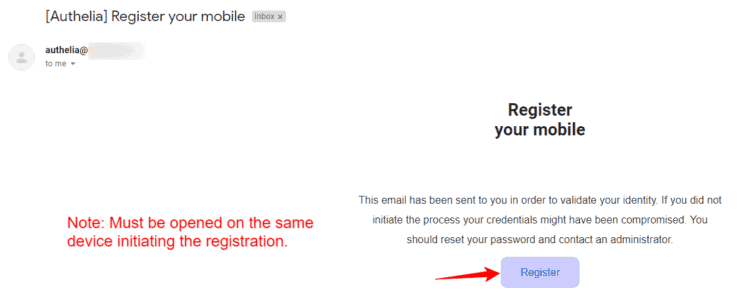
Click and open the registration link.
The link should open a QR Code, as shown in the screenshot below. You can use any of the authenticator apps (Duo, Authy, Google Authenticator, etc.) to scan the code. I recommend Duo because it supports push notifications, which makes authentications easier (described later).
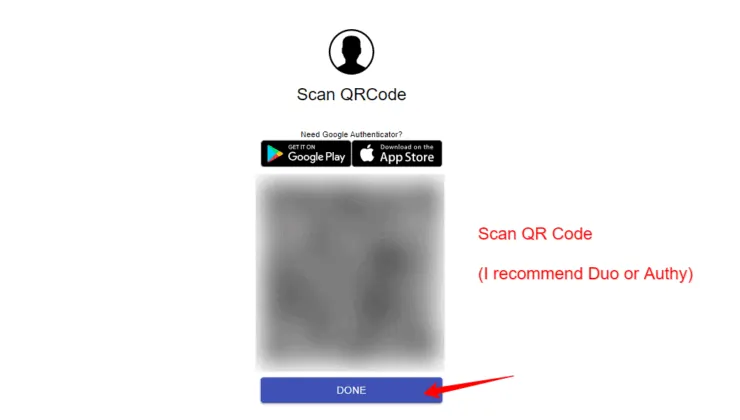
After scanning, enter the OTP code from the authenticator app into Authelia.

This should complete your device registration for Authelia and you should see something like the screenshot below.

That is about it. You can now start using Authelia multi-factor authentication for your Docker apps. Authelia protects some of my key administration apps such as Guacamole. [Read: Install Guacamole on Docker – VNC, SSH, SFTP, and RDP like a Boss!]
Enabling Duo Push Notification for Authelia
As I hinted before, I like Duo because it supported push notifications that allow one-click easy login approvals compared to entering the OTP. Enabling this is a little bit of work and unintuitive.
But don't worry, I will walk you through it and its FREE.
First, head over to Duo's website and register an account.
1. Create a Duo User
From the Users menu, click on Add User as shown below and create a new user.
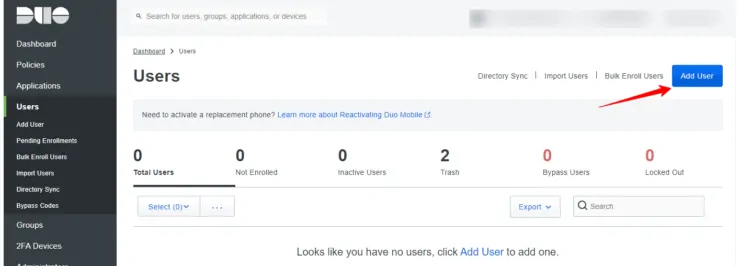
Fill in the user details.
Scroll down and add a phone number.
2. Activate the User
You should see a warning message (shown below) on the Duo admin page that says that the user is not activated.
Send the activation link to the user's/your phone and click the received link to activate the user.
3. Create an Application
Under Applications, select Protect an Application, search for Partner Auth API and click Protect, as shown below.

Once created, copy the Integration key, Secret key, and API hostname.
4. Configure Duo API in Authelia Configuration
Open up Authelia's configuration.yml and add the following code block to it. I added it between totp: and authentication_backend: blocks.
# Enable the following for Duo Push Notification support
duo_api:
  hostname: API_HOSTNAME_GOES_HERE
  integration_key: INTEGRATION_KEY_GOES_HERE
  # This secret can also be set using the env variables AUTHELIA_DUO_API_SECRET_KEY_FILE
  # secret_key: SECRET_KEY_GOES_HERE # use docker secret file instead AUTHELIA_DUO_API_SECRET_KEY_FILE
Use the copied details from the previous step to customize the above code. Once again, here were defining the secret_key as a docker secret. So follow the steps described previously. Alternatively, you can choose to replace SECRET_KEY_GOES_HERE with the secret key.
That's it. Now save Authelia configuration and restart the authelia docker service.
5. Test Authelia Duo Push Notification
Try to access a Docker app behind Authelia. This time from Methods, choose Push Notification as shown below.
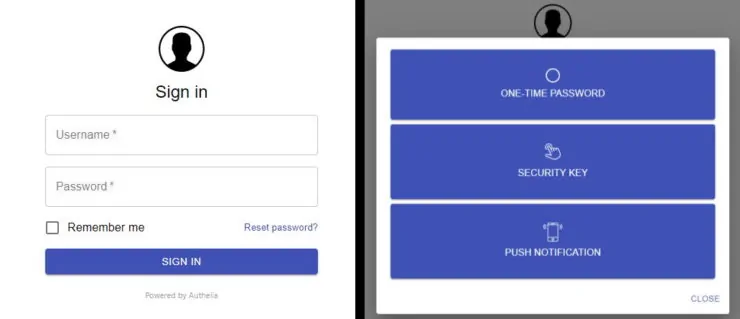
You should receive a push notification on your phone and all you need to do is approve with one click and your login should go through.
Final Thoughts on Authelia for Docker Traefik
It seemed like a lengthy process but in reality implementing this Docker Authelia tutorial shouldn't take more than an hour. I was very satisfied with Google OAuth. But I am even happier with Authelia.
I am not sure if Authelia offers more protection than Google OAuth but I feel like I have more control. And the duo push authorization made it simpler to use. I have moved all my services over from Google OAuth to Authelia, including those that run on my Synology Docker Traefik stack.
Authelia does offer support for hardware security keys. I have not explored those yet but if you do, then you are covered there as well.
If you have any piece of information that missed, please feel free to add in the comments to help others. Otherwise, I hope this Docker-Traefik Authelia guide was useful in making your stack more secure.

