Reconfiguring UniFi controller after a move to new host or a server can be a pain. Wouldn't it be awesome if you were able to migrate UniFi controller to a new server without having to configure everything from scratch? Here is how to do it.
Ubiquiti UniFI controller is a web-based management interface for managing several of Ubiquiti's devices. UniFi line of devices are widely gaining popularity as reliable networking gear at both prosumer and enterprise levels. Consumer-grade routers are great for small environments, once I moved to a bigger 3-level house, my reliable ASUS AC68U was not enough to cover the entire house. Actually, routers are powerful enough but most devices do not have powerful enough radios to send data back to the router through all the walls, which is why access points or mesh networks are gaining popularity.
A reliable network is very important for wholesome smart home experience. [Read: What is a smart home and what can smart home automation do for you?]
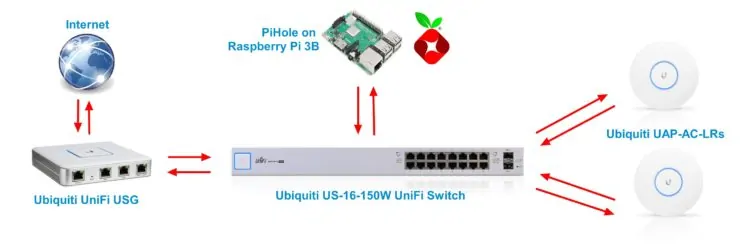
In 2017, I added Ubiquiti UniFi devices to my smart home setup, which shown below.
I use the following UniFi devices in my home network:
- Ubiquiti Unifi Security Gateway (USG)
- Ubiquiti US-16-150W UniFi Switch
- Ubiquiti UniFi UAP AC Long Range access points
As you can see I also have Pi-Hole running as a network-wide ad blocker. [Read: Complete Pi Hole Tutorial – Network-wide whole home Ad blocker]
Table of Contents
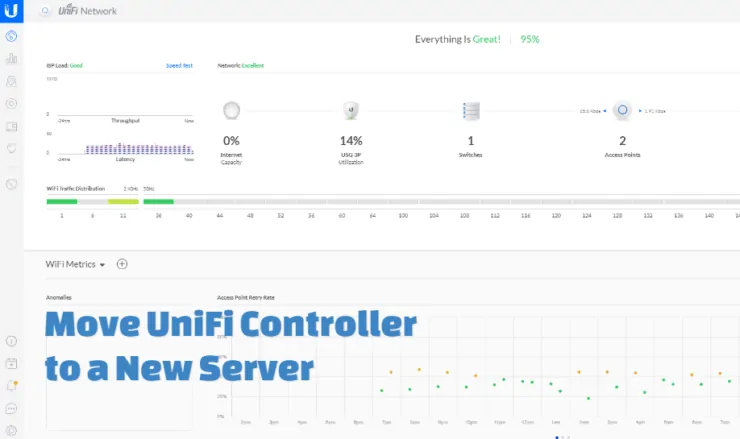
Move UniFi Controller to New Server
I previously ran UniFi controller on my Docker-based Home Server with Traefik Reverse Proxy. I constantly tinker with my Intel NUC Home Server. This made UniFi controller unavailable at times. So I decided to move UniFi controller to cloud. Currently my controller is hosted on Vultr VPS and it has been working great!
I have migrated Ubiquiti UniFi controller several times: Windows to native Linux app to Docker to native Linux app on DigitalOcean VPS to finally now on Docker on Vultr VPS. I made these moves without losing the settings for my home network site. Otherwise, it would have been a lot of work to configure each and every device again. In this UniFi controller migration guide, I am sharing the process I used.
Requirements
There are several basic requirements for successfully following this guide:
- Access to current UniFi controller
- New controller software installed on new server
- Both old and new controller software versions must be the same - not required but can cause problems sometimes
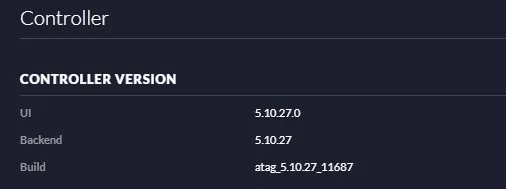
The environment in which the UniFi controller software resides (Windows, Linux, Mac, Docker, etc.) does not matter.
1. Backup UniFi Controller Settings
On the existing UniFi controller, back up your settings and download it to a known location. You can do this by going to UniFi controller Settings->Auto Backup->Download, as shown in the image below.
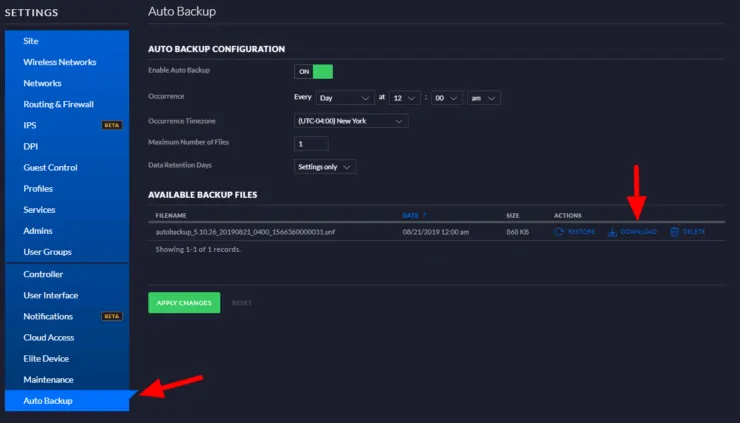
UniFi settings will be downloaded as .unf file.
2. Install UniFi Controller on New Server
If you do not have UniFi controller installed already, I strongly recommend going the Docker way. You may follow my guide to install UniFi controller on Docker with Traefik Reverse Proxy. I followed this procedure to get UniFi controller running on the new VPS.
There are compiled executables for several platforms. Visit, UniFi Controller Download page to download and install yours.
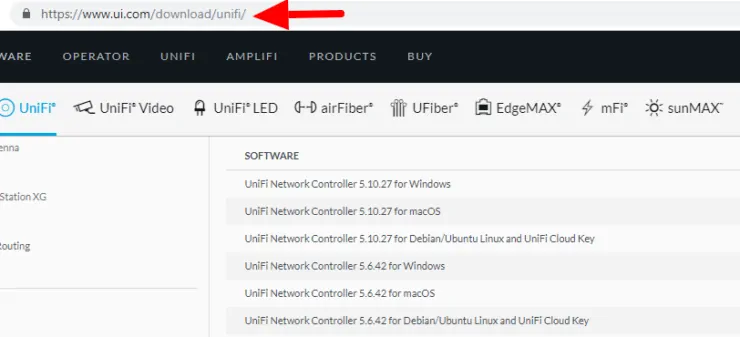
Based on my previous experiences, I strongly discourage using native Windows app as I had a lot of issues with Java and the interface freezing up on me.
3. Restore UniFi Controller Settings
There are at least 3 ways you can migrate UniFi controller settings to a new controller software. The easiest way to restore UniFi configuration is during initial setup using the wizard, as shown below. Click on restore from previous backup and load the .unf backup file downloaded in step 1.
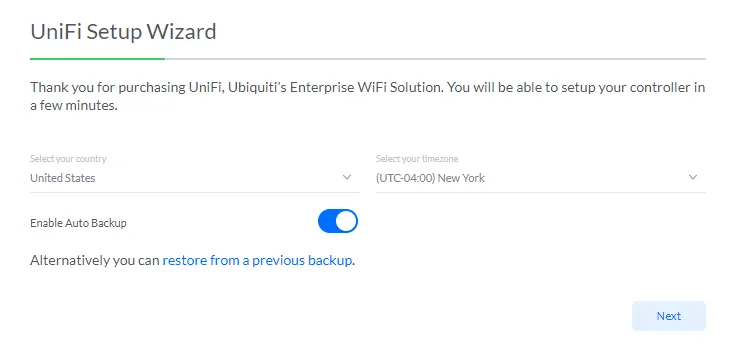
The next option is to go through the initial setup wizard first. You do not need to add any devices (press Next) or create a WiFi network (press Skip). The only two things you will have to do is provide admin user details for the controller and device authentication details as shown below.
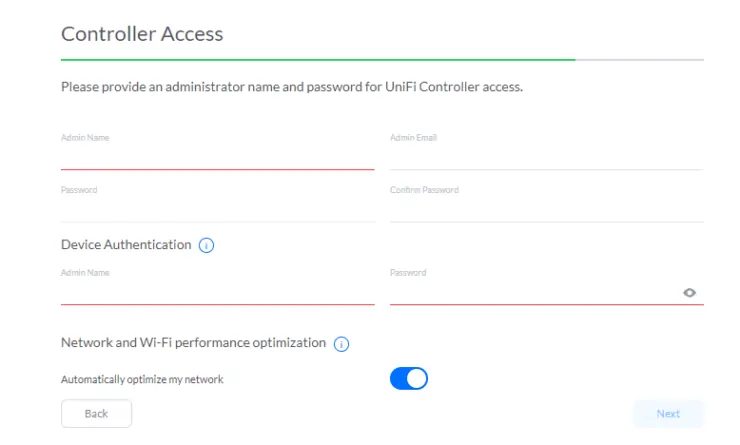
You will need the device authentication details to re-adopt your UniFi network devices into the new controller. Confirm and finish the setup wizard. Since we are restoring from previous backup, you may hit Skip for Cloud Login Credentials. Once done, you should be on UniFi controller interface. From here, go to Settings->Maintenance and restore the .unf backup file, as shown below.
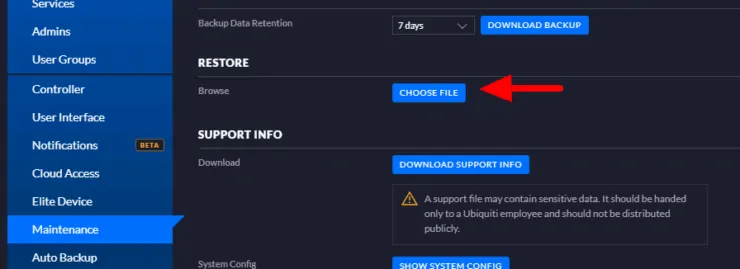
Hit Confirm and give it a few minutes. Your site and its settings should be restored and the controller will be restarted (it can take a while ~5 to 10 min). Login using your old controller credentials and continue to move UniFi controller.
The third option to restore UniFi backup is very similar to the second one and only applies if you already have a functional site on the new UniFi Controller. In this case, add a new site and then restore the settings as above.
4. Set New UniFi Controller IP/Hostname
The location of your UniFi controller has now changed. Therefore, you will have to go to Settings->Controller and change the Controller Hostname/IP, to reflect the new one.

Enter your new controller host IP address (local home network or IP of your cloud instance). Alternatively, you may use a FQDN, which is what I do. Then check Override inform host with controller hostname/IP and save the settings. If your UniFi controller is hosted on the cloud (away from your home network) or on a different subnet, you may disable the Make controller discoverable on L2 network option.
5. Re-adopting Devices
We are not done migrating UniFi controller completely yet. After restoring the settings you may notice that you see your devices but none of them are manageable on the controller as shown below.
This is because your UniFi devices have not yet been adopted/recognized by the UniFi controller software. Your UniFi devices need to start sending data to your new controller. This involves modifying the inform IP on all your devices.
Controller on Same Network (L2 Adoption)
If your UniFi controller move was to a new server within same broadcast space (subnet) then the re-adoption of devices is quite easy. All you have to do is shutdown your old UniFi controller and have the new controller running. UniFi devices should automatically re-associate with the new controller. UniFi devices, by default inform to hostname unifi on port 8080. If there are two controllers with the same hostname, it will cause conflicts and hence shutting down your old controller is important.
However, if you had manually modified the inform IP previously (described below) to point to a specific IP address on your network (or hostname) and the IP address/hostname of your new UniFi controller server is different, then you will have to follow the method below (L3 adoption) to update the inform URL for the devices to be recognized again.
Controller on Different/External Network (L3 Adoption)
When UniFi controller is located on a different subnet or externally/remotely (eg. cloud VPS) then there are multiple ways to update inform IPs on your UniFi gear. Ubiquiti has an article on the various adoption methods. I am going to show you the two ways I followed and think are the easiest.
Method 1: Update Inform URL Using Ubiquiti Device Discovery Tool
Ubiquiti Network offers a Google Chrome app called Device Discovery Tool. You install the app, launch it, and click on UniFi Family as shown below. Any unadopted device should show up on the list.

The keyword above is unadopted, which means if a device is already informing a controller it will not show up and you cannot modify the inform IP using this tool. You will have to shut down the controller that the device is informing to and then rescan on the discovery tool. Alternatively, you may use the SSH method described below.
Once any unadopted device shows up, click Action and fill in the details highlighted below.
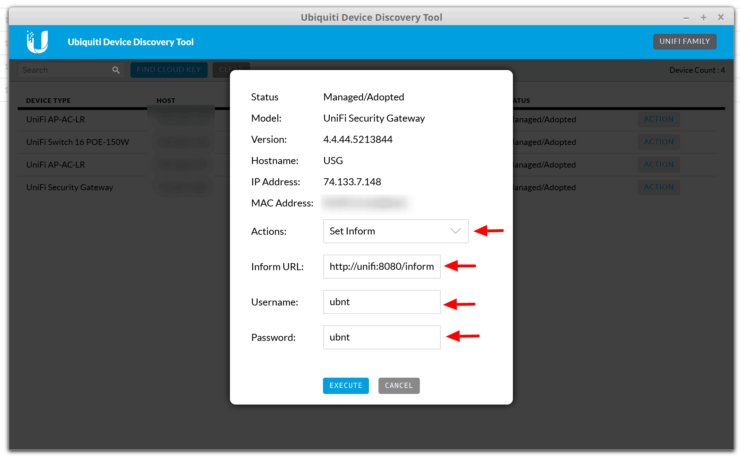
You need four pieces of information:
- Actions: This will be Set Inform
- Inform URL: This will include either the IP address or hostname of your controller. In my case, since the controller is located on the cloud, I am using a subdomain: unifi.example.com. So my inform URL is http://unifi.example.com:8080/inform. You can also replace unifi.example.com with IP address or local hostname.
- Username: This is the device authentication username from step 1.
- Password: This is the device authentication password from step 1.
As you update the above information and click Execute for each device, it should disappear from the list, indicating that it has been adopted (remember: only unadopted devices show up on the list). Within a few minutes after updating the inform URL, your UniFi controller migration will be complete and the devices should be re-adopted on your new controller.
Method 2: Update Inform URL Using SSH
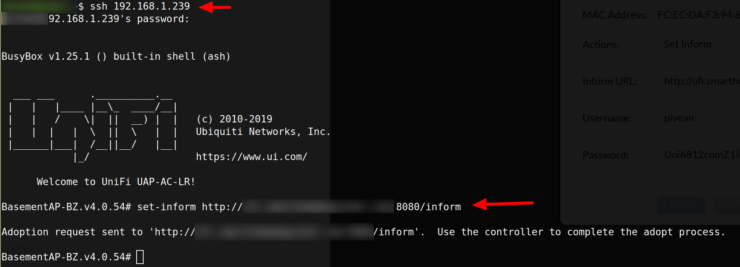
Using each devices IP address (local) you can SSH into it using the device authentication details from step 1. For SSH, I recommend using PuTTY or one of the PuTTY alternatives. There are also several Android SSH clients that can be used for this purpose. Once you login, you should reach the root terminal on each device (indicated by the # at the end of the prompt).
On UniFi Security Gateway (USG), you will need to issue one additional command first to reach the root terminal (not needed for switches and APs):
mca-cli
Once you are at the root terminal, issue the following command to update the inform URL for each device:
set-inform http://unifi.example.com:8080/inform
Remember to replace unifi.example.com with the IP address or hostname in your situation. The whole process should flow something like what is shown in the image below.
In addition to the above methods, using your mobile phone app is also convenient. This is described in detail in Ubiquiti's remote adoption methods article.
Verifying UniFi Controller Migration to New Server

The last step in moving UniFi controller to a new host is verifying that all the network devices have been adopted successfully and reporting data to your new UniFi controller. If everything went well then your devices on your new controller should all say Connected as shown above.
Like I said before, I have migrated UniFi controllers several times and I learned quite a bit during the process. In this Ubiquiti UniFi migration guide, I tried to share what I learned so a beginner can follow along. If you have any trouble, just shoot me a comment below and I will try to help you out. Otherwise, enjoy moving your UniFi controller to a new server.

