In this article, we're going to be walking you through how to both set up OpenMediaVault on your Raspberry Pi, as well as configure an SMB share to run from the Pi. To start, first download the .iso for the Pi from the OpenMediaVault SourceForge page. Format the SD card, then write the image to it. Once the image is written, you’re ready to set-up your server. You’ll need your Pi’s IP address to connect to OpenMediaVault and configure it. How you do all this will depend on your platform. Check out this OpenMediaVault Raspberry Pi set up! [Read: 6 Ways to store local media for streaming on Kodi, Plex, and more]
Table of Contents
Raspberry Pi Samba server: Installing OpenMediaVault Server and getting the IP
OpenMediaVault Raspberry Pi set up varies based on your system. Here's how to get started configuring a Raspberry Pi Samba server by installing OpenMediaVault and obtaining your IP address. [ Read: Automount Samba share]
OSX
Using SD Formatter and ApplePi Baker, create an SD card with OpenMediaVault installed on it. Open up Terminal and use the command arp -a. It will show you a list of devices connected to the same network as you.

At this point, you’ll want to insert the SD card, connect your Pi to the network and power it on. Run arp -a again after a few minutes to see the new addition to the list - this should be the IP address of the Pi.

Windows
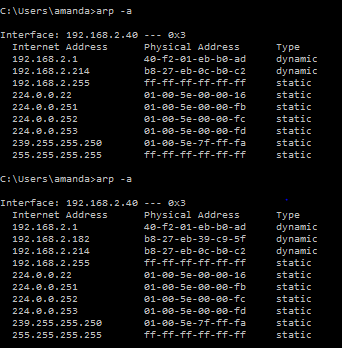
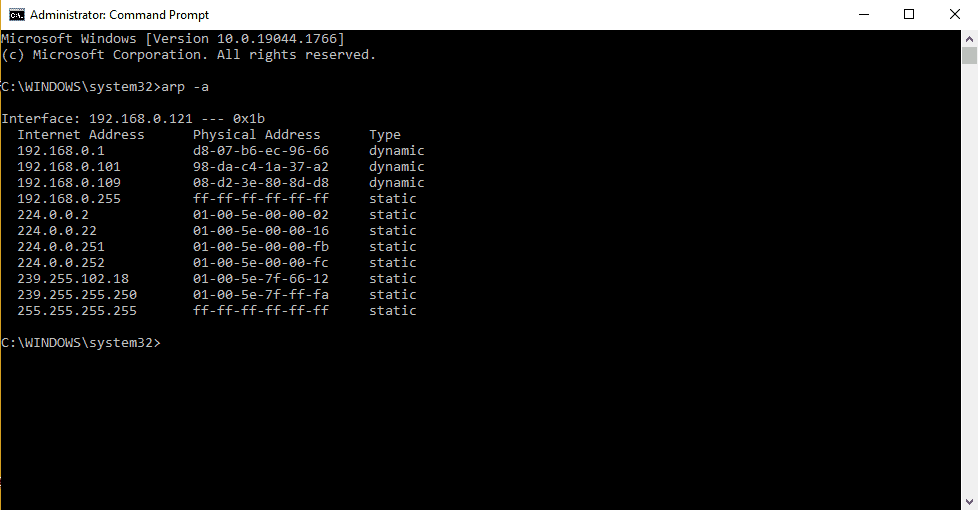
Using SD Formatter and Win32 Disk Imager, create an SD card with OpenMediaVault installed on it. Open up Command Prompt and use the command arp -a. It will show you a list of devices connected to the same network as you. At this point, you’ll want to insert the SD card, connect your Pi to the network and power it on. Run arp -a again after a few minutes to see the new addition to the list - this should be the IP address of the Pi. [Read: Enable and configure OpenELEC Samba share on Raspberry Pi]
Linux
Format your SD card through the Terminal, then write the .iso to the card using Etcher.
The easiest way to find out the Pi's IP address once it's connected through the network is by using Nmap. Open up a Terminal window and enter the following:
sudo apt-get install nmap -y
Hostname -I
192.168.Y.XXX
Your output will have numbers instead of Y's and X's - use those to run the next command:
nmap -sn 192.168.Y.0/24
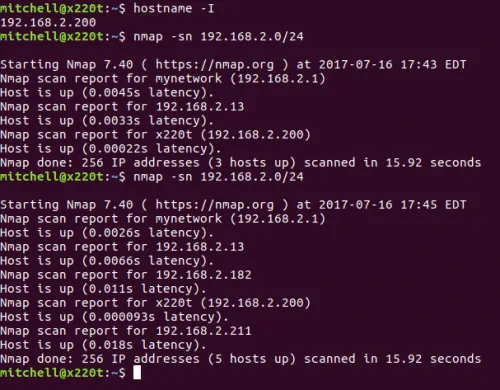
This will return a list of devices connected to the network. Insert the SD card, connect your Pi to the network and power it on. Run Nmap -sn 192.168.Y.0/24 again and compare the differences to find the IP address of the Pi. [Read: Monit: Monitor file server status (Samba and NFS)]
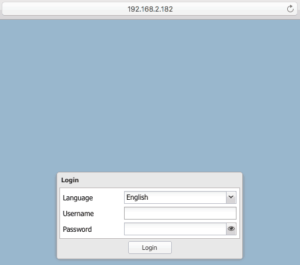
The next step in our OpenMediaVault Raspberry Pi set up involve adding a Samba share. This guide assumes you want to use an external USB drive to store the content to share over Samba. First, you'll need to plug in the USB drive to your Pi. Then, connect to the OpenMediaVault web GUI by navigating to the IP of your Raspberry Pi in your browser window. Login using username root and password openmediavault. These can be changed later. [Read: How to install OpenELEC on Raspberry Pi 3 - Kodi media center OS]
Configuring your drive
Here, you'll need to plug in the USB drive to your Pi in order to share it over Samba using your server. Navigate to Physical Disks in the sidebar to ensure OpenMediaVault can see the drive. [Read: How to install XBian on Raspberry Pi 3 - Lightweight Kodi OS]

Select Filesystems from the navigation pane, then click Create. Select your drive from the list. The system will confirm that it is okay to erase all the data on the disk. Confirm, and wait for the filesystem to by created. Then, mount the filesystem using the 'Mount' button. Make sure you save your changes - if you ever have problems configuring settings on OpenMediaVault, it's likely because a change wasn't properly saved. [Read: Setup OwnCloud server with Raspberry Pi 3 - Private cloud storage]

Once you know the drive is mounted OpenMediaVault, go to the SMB section of the sidebar and enable the service. I've kept all the settings as default - the 'Name' needs to be WORKGROUP. See below:
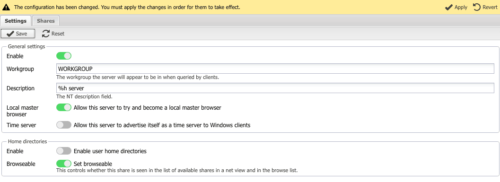
Once you've saved the Samba settings, it's time to create the share. Click on Shares, next to Settings and create a new share, as shown below. Click the '+' next to the Shared Folder field to create a new shared folder. Set permissions to read/write for everyone, because it removes some guesswork if you encounter any issues later on with connecting to the Samba share. [Read: Setup Subsonic with Raspberry Pi 3 - Media streaming server]
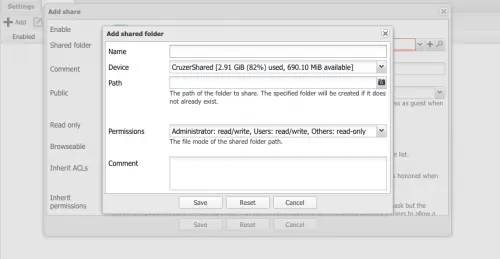
Once the shared folder and the share has been created, go to Shared Folders to update the ACL permissions for your new shared folder, as seen below:
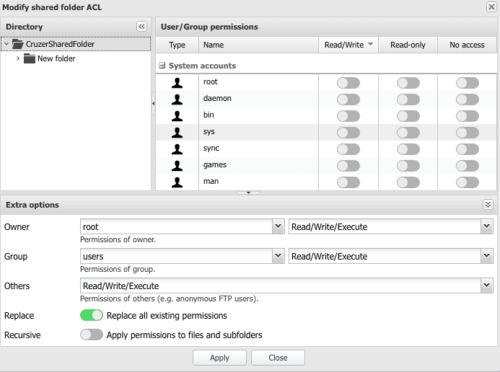
Again, we're making the share available to everyone on the network for convenience. This can be changed later, and permissions set differently for different users. Therefore, you shouldn't put any sensitive content on the share, as it will be accessible to anyone you've allowed to connect to your network. [Read: Setup Plex server with Raspberry Pi 3 - Low power media server]
Further continuing our guide to OpenMediaVault Raspberry Pi set up, let's connect to a Samba share. To connect to the Samba share, simply follow the steps below for your platform. [Read: Setup USB drive for storage on Diet Pi for Raspberry Pi and Odroid C2]
OSX
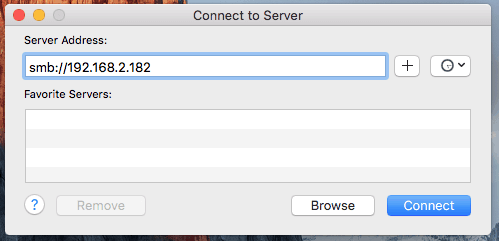
While in Finder, press ⌘+K to connect to the Samba share. You'll get a window requesting the server address. Fill in the relevant information, then hit Connect. You'll be able to see the server in your sidebar and be able to access the files on the share, as well as upload to it. [Read: Setup Emby Server with Raspberry Pi 3 - Media streaming server]
![]()

Windows
Open Windows File Explorer and type the IP address of the Pi into the address bar. You'll be connected automatically and be able to view the shared folder(s). [Read: Setup SickRage download server with Raspberry Pi 3 - TV show downloader]

Linux
Go to the Files, and select Other Locations and enter the IP of the Pi as shown below. [Read: Setup Diet Pi on Raspberry Pi 3 - Lightweight server OS]

OpenMediaVault Raspberry Pi set up: Finishing up
We hope you enjoyed this tutorial on configuring the Raspberry Pi to behave as a Samba share for your network. Keep an eye on htpcBeginner for more news and tutorials on the the Raspberry Pi such as installing LibreELEC, and for OpenMediaVault.


![8 Amazing Raspberry Pi Ideas [2022]: Beginners and Enthusiasts Raspberry Pi ideas](https://www.smarthomebeginner.com/images/2021/09/raspberry-pi-4-dev-board.jpg)