The Raspberry Pi 3 is not a very powerful device for everyday computing, but it can be used as a media player without any issues. There is a lot of debate for the best operating system(OS) to run on the Raspberry Pi, and today i will show you how to install XBian on Raspberry Pi 3. We previously presented a list of the best media center operating systems for Raspberry Pi, as well a comparison of OpenELEC, OSMC, and Xbian. Without further ado, let's check the Raspberry Pi XBian installation steps, and go through the XBian Raspberry Pi setup.
Table of Contents
What is XBian?
XBian is a small, fast, and lightweight media center distribution for the Raspberry Pi. It is based on the Debian Linux distribution and the main focus for the team is to offer the fastest Kodi solution for various small form factor computers. One of the main attractions, when you install XBian on Raspberry Pi, is the fact that you are basically running a Debian distro. This allows you to easily install other services on the same OS and turn your Raspberry Pi XBian installation into a small form-factor server. As a result, you can install services like Sonarr and Sickrage to automate your media downloads, and also a download client like Transmission. [Read: Setup SickRage Download Server with Raspberry Pi 3 – TV Show Downloader]
Although we're focusing on an XBian Raspberry Pi setup, there are many flavors of XBian available for multiple devices. You may use XBian to build a cheap 4K HTPC for Kodi, OpenELEC, and LibreELEC or a budget HTPC-NAS combo using an old PC.
If you want to learn more about the team's plan for XBian, visit their website.
Preparation for Raspberry Pi XBian installation
1. Download XBian Image for Raspberry Pi 3
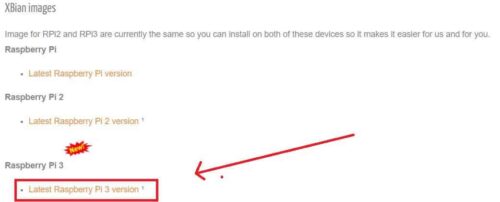
In order to install XBian on Raspberry Pi 3, we first need to visit the download section of the XBian website. Scroll down until you reach the Raspberry Pi 3 section, then select the latest version link to download the image file, like shown in the image below.
2. Download Etcher - For writing XBian image to SD card
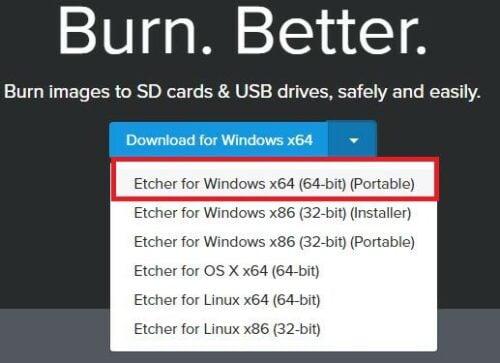
While the XBian image is downloading, we need to download an app for writing the image to the SD Card. I am using Etcher because it also performs validation after writing the .img file and it has an intuitive interface. To download it, navigate to the etcher.io site and click on the arrow next to the Download for Windows button. Select the portable version for Windows.
Surfshark VPN Exclusive Offer - 82% off ($2.39/month):
♦ Hide your browsing (no logs), Anonymize Streaming and Downloads
♦ Wireguard Protocol support for VPN.
♦ Circumvent Geo/Country Restrictions and access worldwide content
♦ Works on Windows, Mac, Linux, Android, iOS, Router, and more
♦ 1 TB Encrypted Storage
♦ Money back guarantee - Sign Up Now
Install XBian on Raspberry Pi 3
After downloading both archives make sure you extract them so you have the XBian .img file and the folder for Etcher like in the screenshot below and proceed with the XBian Raspberry Pi setup.
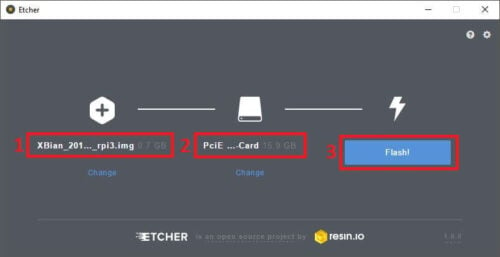
Next, plug the SD Card in the computer, go to the extracted Etcher folder, and double click on Etcher.exe to open it. When Etcher is open, select the XBian image. Next, select the SD Card you previously inserted and click Finish to start writing the image as shown in the picture below.
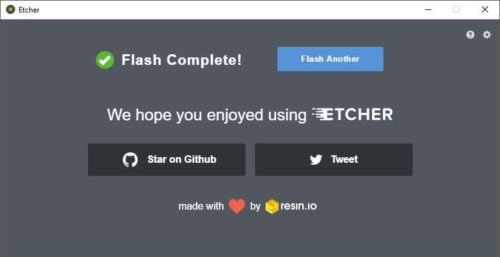
Wait until you get the "Flash Complete!" confirmation that the image has been flashed successfully then take your SD card out and plug it into your Raspberry Pi 3.
Next, connect the power cable to the Raspberry Pi and the XBian boot process will begin. Now all you need to do is wait for the XBian Raspberry Pi setup to run, then go trough the basic configuration. The first boot sequence usually takes about 5 minutes. However, after the first boot, the next restarts will be faster. [Read: A simple yet awesome IR Raspberry Pi remote control for $5]
Xbian Raspberry Pi setup is done. What to do next?
Congratulations! You managed to go through all of the steps required for the Raspberry Pi XBian installation. Now you can enjoy all your media on your Raspberry Pi 3. From here you could customize your Raspberry Pi XBian setup with one of the best Kodi skins for Raspberry Pi. If you want to take your media experience further, check our article on how to setup Plex server with Raspberry Pi 3 and enjoy your media with Plex.


![8 Amazing Raspberry Pi Ideas [2022]: Beginners and Enthusiasts Raspberry Pi ideas](https://www.smarthomebeginner.com/images/2021/09/raspberry-pi-4-dev-board.jpg)
![10 Best Plex Client Devices [2022] - STUTTER-free Streaming Best Plex Client Devices](https://www.smarthomebeginner.com/images/2022/02/best-nas-for-plex-server-featured-images-from-pexels-photography-maghradze-ph-3764958-e1648542743772.jpg)
![10 Best Emby Client Devices [2023] - 4k, Hardware Transcoding, etc. setup emby server with raspberry pi](https://www.smarthomebeginner.com/images/2017/02/setup-emby-server-with-raspberry-pi.jpg)
![10 Best Jellyfin Client Devices [2022] - 4k, Hardware Transcoding, etc. Jellyfin Roku App](https://www.smarthomebeginner.com/images/2021/02/jellyfin-roku-client-app-ft.jpg)

