While the Raspberry Pi 3 is not a very powerful device, it's just enough to run Kodi flawlessly. Usually, you would need to install a Linux distribution, then install Kodi. But if you follow our guide, you will complete your Raspberry Pi 3 OpenELEC setup in just a few minutes. We previously presented a list of the best media center operating systems (OSes) for Raspberry Pi, as well a comparison of OpenELEC, OSMC, and Xbian. In this post, you will learn how to install OpenELEC on Raspberry Pi 3. [Read: OpenELEC vs OSMC for Raspberry Pi 2 Media Center]
Table of Contents
Install OpenELEC on Raspberry Pi 3
OpenELEC stands for Open Embedded Linux Entertainment Center. It is a Linux distribution built to run Kodi on popular media center hardware. Continue reading and let me guide you through your Raspberry Pi 3 OpenELEC setup. Although we're focusing on an OpenELEC Raspberry Pi 3 installation, there are many flavors of OpenELEC. You may use OpenELEC to build a cheap 4K HTPC for Kodi, OpenELEC, and LibreELEC or a budget HTPC-NAS combo using an old PC.
| Build a Low-Cost Raspberry Pi Media Center | Price |
|---|---|
| Raspberry Pi 4B Starter Kit with case, power adapter, and heat sinks | ~$82.00 |
| Sandisk Ultra 32GB Micro SDHC UHS-I Card 98 MB/s | ~$8.00 |
| SANOXY Wireless USB PC Remote Control Mouse for PC | ~$8.00 |
1. Download OpenELEC Image for Raspberry Pi 3
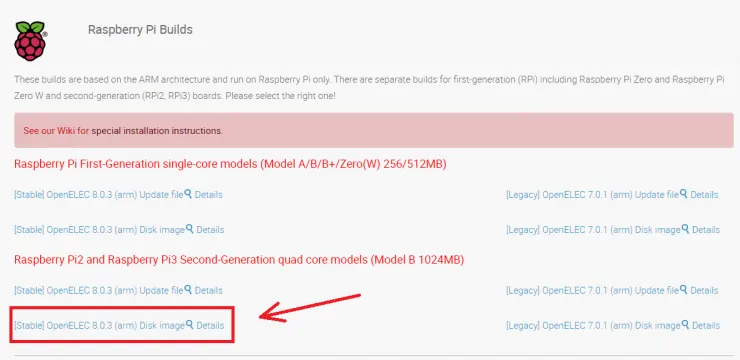
In order to install OpenELEC on Raspberry Pi 3, we first need to visit the download section of the OpenELEC website. Scroll down until you reach the Raspberry Pi section, then select the latest version link to download the image file, like shown in the image below.
2. Download Etcher - For writing OpenELEC image to SD card
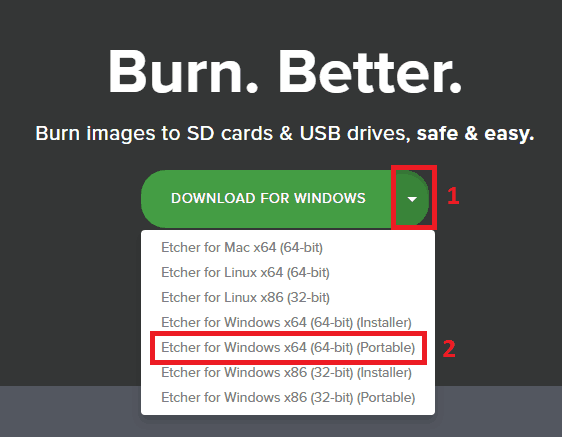
While the OpenELEC image is downloading, we need to download an app for writing the image to the SD Card. I am using Etcher because it also performs validation after writing the .img file and it has an intuitive interface. To download it, navigate to the etcher.io site and click on the arrow next to the Download for Windows button. Select the portable version for Windows.
Surfshark VPN Exclusive Offer - 82% off ($2.39/month):
♦ Hide your browsing (no logs), Anonymize Streaming and Downloads
♦ Wireguard Protocol support for VPN.
♦ Circumvent Geo/Country Restrictions and access worldwide content
♦ Works on Windows, Mac, Linux, Android, iOS, Router, and more
♦ 1 TB Encrypted Storage
♦ Money back guarantee - Sign Up Now
3. Install OpenELEC on Raspberry Pi 3
After downloading both archives make sure you extract them so you have the OpenELEC .img file and the folder for Etcher like in the screenshot below and proceed with the Raspberry Pi 3 OpenELEC setup.

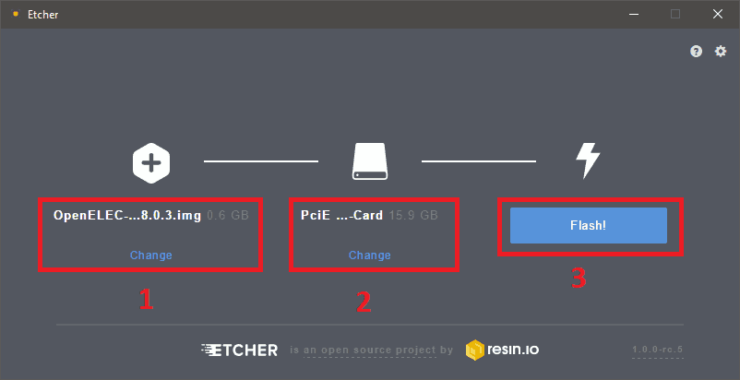
Next, plug the SD Card in the computer, go to the extracted Etcher folder, and double click on Etcher.exe to open it. When Etcher is open, select the OpenELEC image. Next, select the SD Card you previously inserted and click Finish to start writing the image as shown in the picture below.
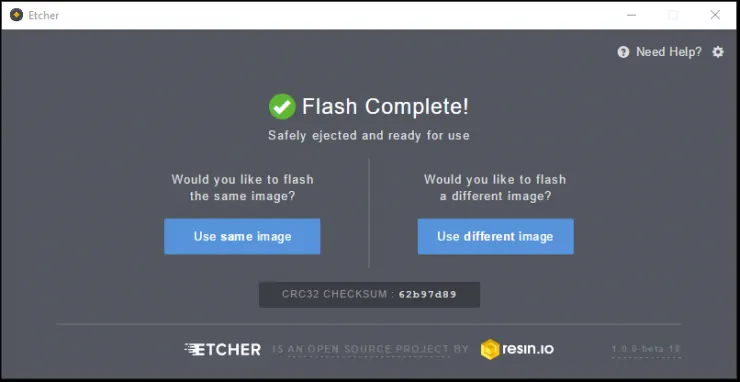
Wait until you get the "Flash Complete!" confirmation that the image has been flashed successfully then take your SD card out and plug it into your Raspberry Pi 3.
Next, connect the power cable to the Raspberry Pi and the OpenELEC boot process will begin. Now all you need to do is wait for OpenELEC to boot and go trough the basic configuration. The first boot sequence usually takes about 5 minutes. However, after the first boot, the next restarts will be faster. [Read: A simple yet awesome IR Raspberry Pi remote control for $5]
Raspberry Pi 3 OpenELEC Setup is done - What Next?
Congratulations! You managed to go through all of the steps required for the Raspberry Pi OpenELEC installation. Now you can enjoy all your media on your Raspberry Pi 3. From here you could customize your Raspberry Pi OpenELEC build with one of the best Kodi Skins for Raspberry Pi. There are also several Kodi streaming addons or live/broadcast TV addons that take your OpenELEC to the next level.

![8 Amazing Raspberry Pi Ideas [2022]: Beginners and Enthusiasts Raspberry Pi ideas](https://www.smarthomebeginner.com/images/2021/09/raspberry-pi-4-dev-board.jpg)

![10 Best Plex Client Devices [2022] - STUTTER-free Streaming Best Plex Client Devices](https://www.smarthomebeginner.com/images/2022/02/best-nas-for-plex-server-featured-images-from-pexels-photography-maghradze-ph-3764958-e1648542743772.jpg)
![15 Best Plex Alternatives [2022] - FREE and BETTER Options Best Plex Alternatives feature image](https://www.smarthomebeginner.com/images/2022/08/best-plex-alternatives-feature-image.gif)
![10 Best Jellyfin Client Devices [2022] - 4k, Hardware Transcoding, etc. Jellyfin Roku App](https://www.smarthomebeginner.com/images/2021/02/jellyfin-roku-client-app-ft.jpg)
![10 Best Emby Client Devices [2023] - 4k, Hardware Transcoding, etc. setup emby server with raspberry pi](https://www.smarthomebeginner.com/images/2017/02/setup-emby-server-with-raspberry-pi.jpg)