Your system should be safe from the moment it boots up. In order to achieve this, your VPN connection should start automatically as soon as you boot your system. This guide tells you how to configure OpenVPN autostart Linux option, in order for your Linux system to be always safe and protected from prying eyes. To start, you should have installed OpenVPN and have it up and running. One of the perks of an auto start VPN setup is that you do it once and forget about it. Say you want to access same content in the same country, and don’t want to activate the script manually every time. The good news is that this guide will teach you how to do just that. [Read: VPN vs DNS: Which one should you choose and why?]

Table of Contents
Configure OpenVPN autostart Linux: Requirements
- A Debian distribution. For this tutorial, I will be using OSMC. You can compare it with other distros, for example compare OSMC vs OpenELEC, and choose the one that fits best your needs.
- An installation of OpenVPN for your system.
- A VPN provider.
Surfshark VPN Exclusive Offer - 82% off ($2.39/month):
♦ Hide your browsing (no logs), Anonymize Streaming and Downloads
♦ Wireguard Protocol support for VPN.
♦ Circumvent Geo/Country Restrictions and access worldwide content
♦ Works on Windows, Mac, Linux, Android, iOS, Router, and more
♦ 1 TB Encrypted Storage
♦ Money back guarantee - Sign Up Now
Configure Linux OpenVPN Autostart
Open a terminal and type
cd etc/openvpn
For this tutorial, I will be writing yourVpnServer instead of the actual VPN server. You will have to fill in the required information. Depending on your provider the name of the server will differ. The name of the server is the one given by the filename on the .ovpn file you can get from your VPN provider. An example could be: uk2.nordvpn.com.tcp443.ovpn.
First we will need to login to the VPN server. Select your favorite VPN server, then type in terminal the following command:
sudo nano "yourVpnServer.ovpn”
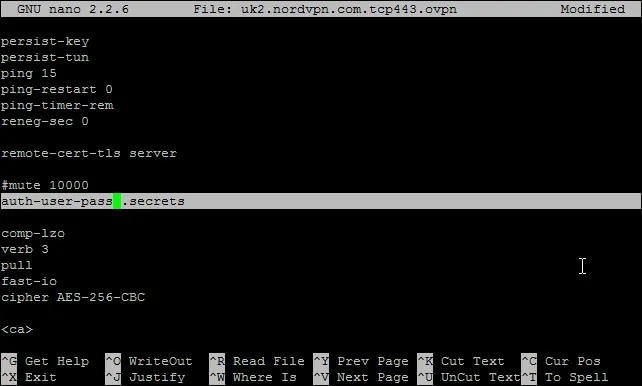
Change the line that says:
auth-users-pass
to:
auth-users-pass .secrets
After you do this, press Ctrl+X and then Y in order to save your changes.

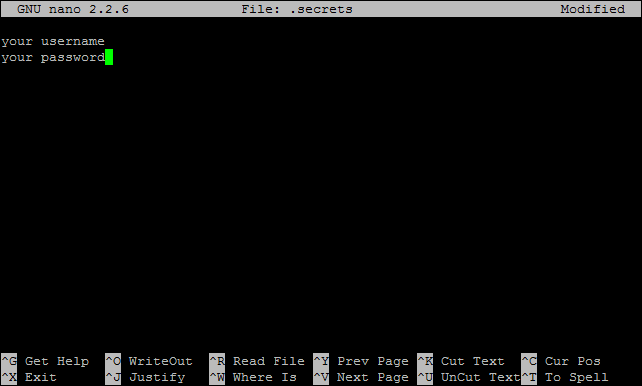
After you do this, create a file with nano. You will not be able to see this file if you run a ls command. Type in terminal:
sudo nano .secrets
On this file, type your username and password for your VPN provider, one below the other, as shown in the picture. Then press Ctrl+X and Y in order to save your changes.

To test that your connection is working properly, type:
sudo openvpn yourVpnServer.ovpn
This command will start your VPN connection. If you want to stop and kill the VPN tunnel, use Ctrl+C.
Linux OpenVPN Autostart script: configuring automatic connection
You need to have root user privileges in order for these instructions to work. Type the following instructions:
sudo su
openvpn yourVpnServer.ovpn
Stay logged in as root and continue. In my case I’m using NordVPN as provider so I called the file NordVPN, but you can call it whatever you like. After you type the instructions above, type the following command:
nano /etc/init.d/youVpnProvider
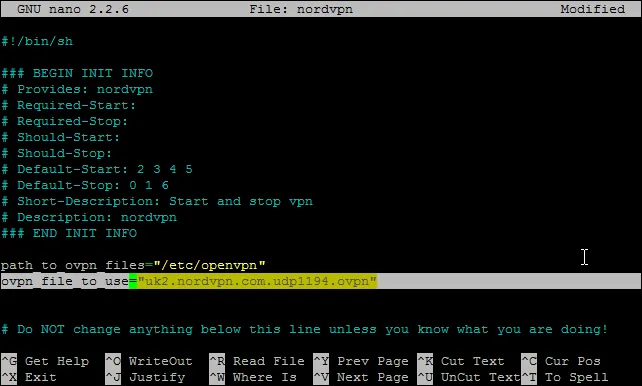
You have started creating a script to automatically connect to your VPN provider. Copy and paste the script below in order to get the right commands to achieve this. Please note that the line where it says yourVpnServer.ovpn should contain the .ovpn filename for the server you will be using instead. You will also need the full path to the .ovpn file you will use, which for this example is /etc/openvpn.
#!/bin/sh

### BEGIN INIT INFO
# Provides: OpenVPN
# Required-Start:
# Required-Stop:
# Should-Start:
# Should-Stop:
# Default-Start: 2 3 4 5
# Default-Stop: 0 1 6
# Short-Description: Start and stop OpenVPN
# Description: OpenVPN
### END INIT INFO

path_to_ovpn_files="/etc/openvpn"
ovpn_file_to_use="yourVpnProvider.ovpn"

# Do NOT change anything below this line unless you know what you are doing!

exec 1>/var/log/yourVpnProvider.service.log 2>&1

case "$1" in
start)
echo "Connecting to OpenVPN "
cd "$path_to_ovpn_files"
/usr/sbin/openvpn --config "$ovpn_file_to_use" &
;;
stop)
echo "Closing connection to OpenVPN "
killall openvpn
;;
*)
echo "Usage: /etc/init.d/vpn {start|stop}"
exit 1
;;
esac

exit 0

Enabling the Linux OpenVPN autostart service
Type the following commands on your terminal:
update-rc.d yourVpnProvider defaults
service --status-all |grep yourVpnProvider
The console should display: [ - ] yourVpnProvider.service
Type these commands on your terminal:
service yourVpnProvider start
service yourVpnProvider stop
They should execute without problem. Also, you can check the logs of your service with this command:
cat /var/log/yourVpnProvider.service.log
This will let you determine if the tunnel is being established correctly or not. After you have tested these things, it's time to see the external IP address of your device. You could use this excellent tutorial on Commandline IP Address Lookup on Linux, or execute the following command for a less elaborate response:
curl ipinfo.io/ip
Reboot the device to make sure that the Linux OpenVPN Autostart feature is working correctly. That’s it! You have finished the tutorial to successfully configure OpenVPN autostart Linux connection! Do you still need advice with VPN usage? If you use a Windows system, perhaps it's better if you use our tutorial on how to configure OpenVPN autoconnect on Windows 10. You can also use providers such as IPVanish and make things a bit easier. Install IPVanish OpenVPN on Linux Mint 18 or simply Install IPVanish on Ubuntu to secure your browsing on these platforms. Access geoblocked content and secure your browsing, today!


![Ultimate QNAP Docker Compose and Container Station Guide [2023] QNAP Container Station](https://www.smarthomebeginner.com/images/2023/05/ContainerStation.png)
![8 Amazing Raspberry Pi Ideas [2022]: Beginners and Enthusiasts Raspberry Pi ideas](https://www.smarthomebeginner.com/images/2021/09/raspberry-pi-4-dev-board.jpg)