In this guide, I will show you how to auto connect to OpenVPN on Windows 10. OpenVPN increases your privacy on the Internet. If you care about privacy and want to do what you can do avoid other people and companies from spying on your activities on the web then you should continue reading. There are many different reasons for staying anonymous on the Internet that I won’t bore you with so let’s just continue with the guide so that you can take a big step to anonymity.
First let me explain to you what auto connect means, particularly in this context. Auto connect simply means that your computer automatically connects to a certain software program after you start it up and have logged in to Windows. Now, in this case we’re of course talking about a software program that has OpenVPN functionality and is a VPN service provider. Using a VPN service provider keeps your Internet connection secure and your downloads protected. Once you know how to auto connect to OpenVPN on Windows only the IP address of your VPN is leaked to the Internet, not the one you’re actually using! Hence, this is great for your privacy and anonymity and makes sure that you save time and focus only on enjoying the safety and security that a VPN offers to your home server connection! [Read: VPN on Kodi: Should you use it? What does it do?]

If you’re keen on protecting your privacy, here’s a guide to help you do what you can to protect it. It shows you how to auto connect to OpenVPN on Windows 10. It is really easy to follow and once you've completed it you really don’t have to do much more than boot up your computer. What a dream, right?
Table of Contents
Auto connect to OpenVPN on Windows 10
Basically, there’s probably no better way to protecting your privacy on the web than to make sure that your computer auto connects to OpenVPN at startup. And folks, here’s the step-by-step guide that takes you through the easy process of auto connect to OpenVPN on Windows 10. Follow these steps and all you have to do to stay private is to start up your computer. If you do your browsing only from your Android device fear not because it’s very easy to set up a VPN on Android with IPVanish. There's also the option to use IPVanish on Ubuntu . You can also autoconnect to OpenVPN from Linux Mint 18, if you use that OS. [Read: Guide: How to Install IPVanish OpenVPN on Linux Mint 18?]
Surfshark VPN Exclusive Offer - 82% off ($2.39/month):
♦ Hide your browsing (no logs), Anonymize Streaming and Downloads
♦ Wireguard Protocol support for VPN.
♦ Circumvent Geo/Country Restrictions and access worldwide content
♦ Works on Windows, Mac, Linux, Android, iOS, Router, and more
♦ 1 TB Encrypted Storage
♦ Money back guarantee - Sign Up Now
Prerequisites
First of all you need to have OpenVPN installed. Simply download OpenVPN and install it. A VPN service provider is also necessary because it will give you a .ovpn file. These files are needed to auto connect to OpenVPN on Windows. We have a guide on how to install OpenVPN on Windows. After that, you need to configure OpenVPN on Windows. Once these steps are completed, we can set up our system to autoconnect to OpenVPN on startup.
Task scheduler
A lot of stuff you need to do before you can actually start doing what brought you to this guide, I know. But I promise it’s worth your while because it helps you safeguard your privacy! And once you start following guides and implementing them you will eventually pick up your speed and understanding.
First, open the windows app Task scheduler. Simply click on the search icon on the bottom left side of the navigation bar and type task scheduler. Then double click on the result (task scheduler with the text Desktop app just below as shown in the image).
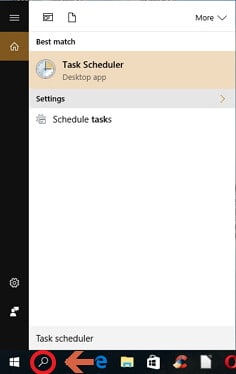
You can also just click on the Windows logo on the absolute bottom left of the navigation bar. Then click on the settings symbol. Type Task scheduler in the search bar. Then double click on the result named Task scheduler.
Create a basic task
First you need to Create a basic task. Click on Create a basic task as shown in the image below. Then click Next.

Set the trigger
Now it is time to set the Trigger. Here you set when you want the task that you’re creating to start (what should trigger it). Simply mark When I log on. Then click Next.
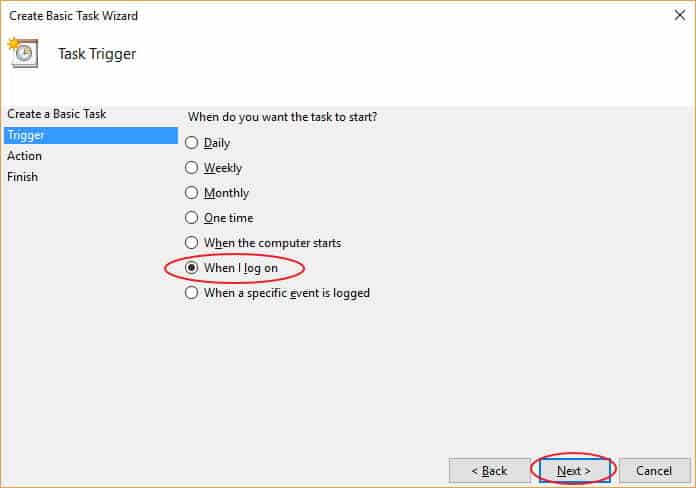
Set Action and add arguments
It is now time to set what Action you want the task to perform and because you want the task to start a program simply mark Start a program and then click Next.
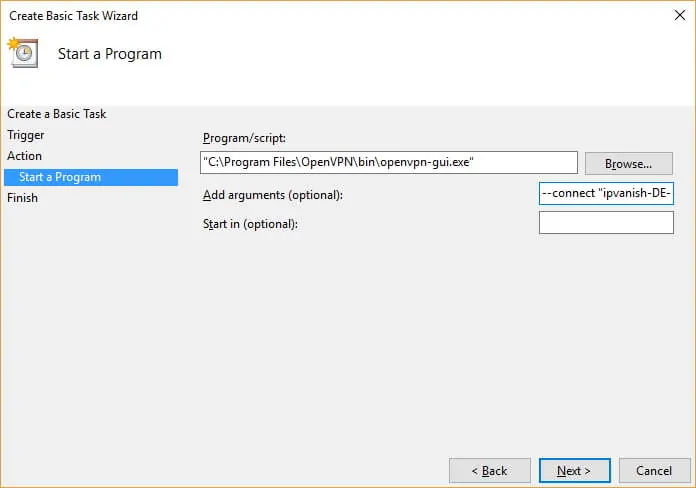
Then it’s time to pinpoint what program you want the task to start. Click on Browse. Find the file named OpenVPN-gui.exe. You should find the file in one of the following two directories on your computer.
C:\Program files\OpenVPN\bin
or
C:\Program files(x86)\OpenVPN\bin
This requires a special note because you either have one or the other. If you use Windows 64-bit you have the file that doesn’t contain (x86) and vice versa.
Then you need to Add arguments. Pay attention because this step is very important. Type the following:
--connect “THENAMEOFYOUR.OVPNFILE”
Your VPN service provider provides the .ovpn file as mentioned above. IPVanish provides a lot of .ovpn files so you have plenty to choose from. This is because they provide you with a whole lot of different IP addresses from all over the world. Just pick whichever fits your needs. Make sure that your .ovpn files are placed in the config folder of your Windows OpenVPN installation. The following example makes it look like you're browsing and using the internet from Frankfurt (using one of the .ovpn files, previously downloaded):
--connect "ipvanish-DE-Frankfurt-fra-a01.ovpn"
Summary
Now you’ll see a summary of your choices and settings for the basic rule that you’ve created to be able to auto connect to OpenVPN on Windows. Now, make sure that the box Open the Properties dialog for this task when I click Finish is ticked.
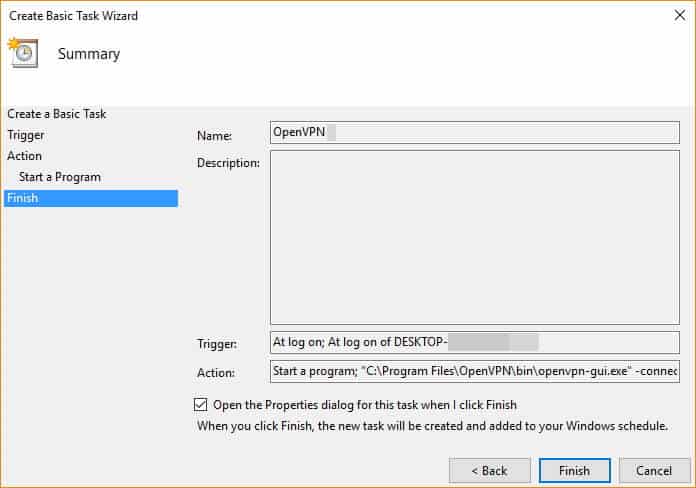
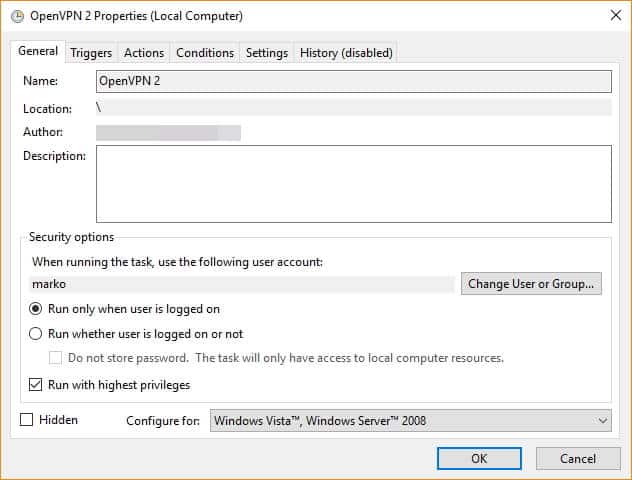
A new box will now open called OpenVPN properties (Local Computer). In the tab General, make sure that the box Run with highest privileges is ticked.
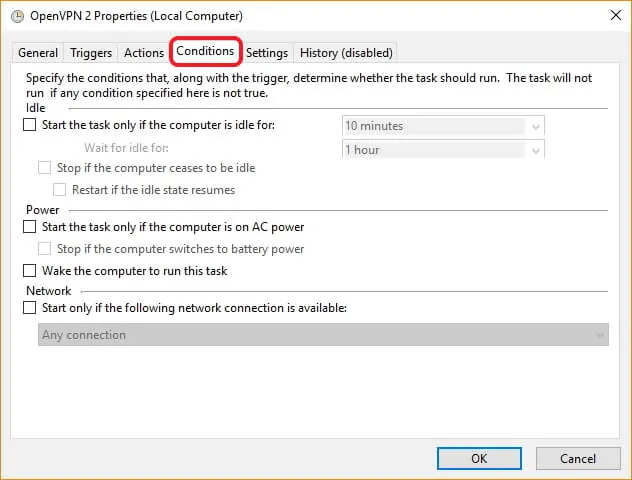
Now go to the tab Conditions and make sure that you have all the boxes unticked as shown in the image below.
Finally go to the tab Settings. Make sure that the boxes are ticked exactly as shown in the image below.

Now you’re all set in the Task scheduler. But for your computer to auto connect to OpenVPN on Windows some additional work need to be done.
Create a notepad file
Open the Windows software Notepad. Type the username of your IPVanish account in the first row of the notepad document. Hit enter. Type the password of your IPVanish account in the second row. For example, your username could be doctorpc and your password could be 12345678. Then the notepad should look like in the image below.

Save the file and name it password. Make sure that you save the file in the folder
C:\Program Files\OpenVPN\config
or
C:\Program Files(x86)\OpenVPN\config
Edit the .ovpn file
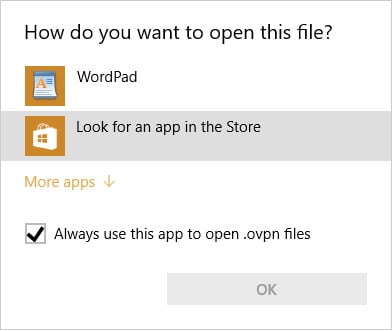
Now you need to edit the .ovpn file that you’re using. You’ll find this in the same folder as above, namely C:\Program Files\OpenVPN\config or C:\Program Files(x86)\OpenVPN\config. In this example, the file that you must edit is named ipvanish-DE-Frankfurt-fra-a01.ovpn. Right click on the file. Choose Open with in the pop up menu. Then choose to open the file with Wordpad.
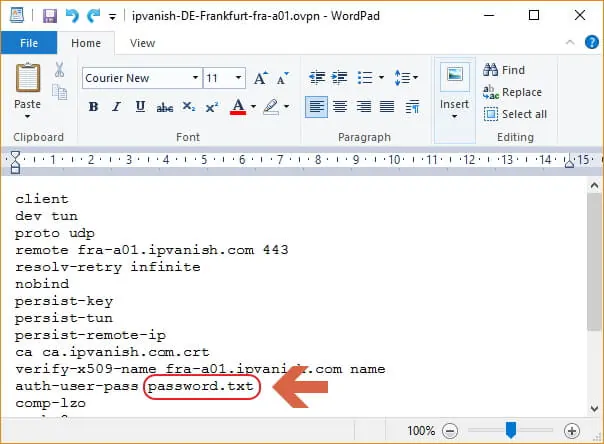
Add password.txt as shown in the image below. The complete line should read auth-user-pass password.txt.
Save the file in C:\Program Files\OpenVPN\config or C:\Program Files\(x86)\OpenVPN\config
If you can’t save the edited file in the above mentioned folder, do the following.
Save the file on your desktop. Don’t change the file name – in the example of this guide it should be ipvanish-DE-Frankfurt-fra-a01.ovpn.
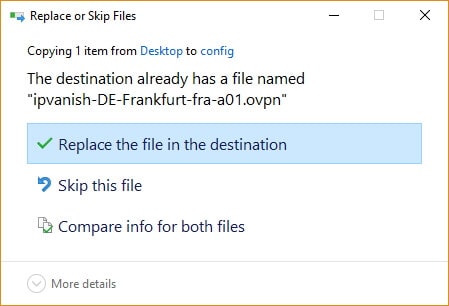
Copy the edited file on your desktop in to C:\Program Files\OpenVPN\config or C:\Program Files\(x86)\OpenVPN\config.
Now click on Replace the file in the destination.
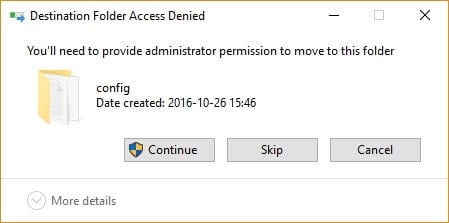
Now a pop up window appears saying Destination Folders Access Denied. Just click on Continue.
Final step (optional)
If you'd like to be able to control that your VPN is up and running then follow these quick steps because it makes sure that a symbol of the OpenVPN is shown in the taskbar. You're connected to your VPN if the symbol is green. You're NOT connected to your VPN if the symbol is gray.
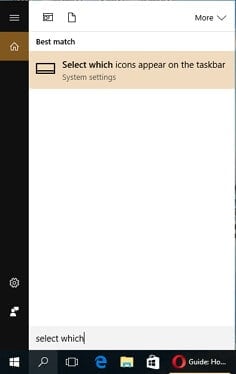
First, you just click on the search icon on the bottom left side of the navigation bar and type select which icons appears on the taskbar. Then just double click on the result.
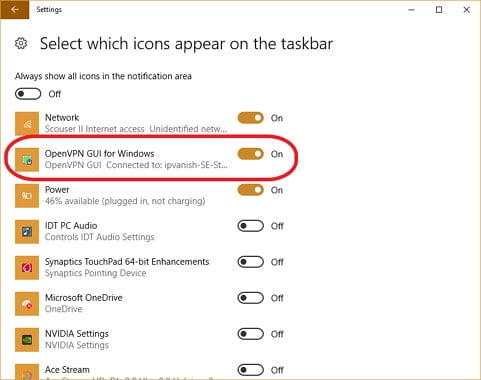
Finally make sure that the OpenVPN GUI for Windows is set to On, as shown in the image below.
Restart your computer
To finish the installation, restart your computer. OpenVPN will auto connect Windows after you have followed all the above steps. Surf safely and I hope you enjoyed our guide to setup Auto connect to OpenVPN on Windows! Looking for more alternatives to access geoblocked content and use the internet safely? Read our comparison between VPN vs DNS and learn how each of these different options can help you achieve a better and safer browsing and streaming!



![8 Amazing Raspberry Pi Ideas [2022]: Beginners and Enthusiasts Raspberry Pi ideas](https://www.smarthomebeginner.com/images/2021/09/raspberry-pi-4-dev-board.jpg)
