I'm not sure if I'm alone on this, but my guess would be I'm not; basically, whenever I watch a movie, I like to have subtitles displayed, even if they are in the same language of the movie. I feel like it increases the enjoyment and makes you aware of all the great quotes and wisdom nuggets present in movies. However, instead of watching media with subtitles directly embedded into it, I wondered if there was a good way to add Kodi subtitles to movies, even if the original movie didn't have them. It turns out it is not only possible to have subtitles on Kodi, but also easier than I had anticipated. [Read: 10 best Kodi movies addons in 2015 for your HTPC]
When I realized you can setup Kodi subtitles for all movies, even if they originally had no subtitles on Kodi, and that, to get subtitles to display, it doesn't matter if you have media on a home server, or if you stream through addons such as Genesis Kodi Addon or Icefilms Plugin for Kodi, I was amazed not only because of this fact, but also because these subtitles are completely configurable to your liking. You can modify their color, size, position on the screen, delay, give them stereoscopic depth, and have them display in any language. So if your native language is not English, or you are learning some other language and using movies as a helpful way to do it, the subtitles bring yet another level of customization and depth to your Kodi experience that you shouldn't miss.
Table of Contents
Okay but, how do I add Kodi subtitles?
First, make sure you are using Kodi Gotham v13 or higher, since lower versions of Kodi won't support this feature. Also make sure you have a pretty up to date skin. For this tutorial, all images are from the skin "Confluence", but if you want more skin options don't hesitate to read about our 6 best skins for Kodi in 2015 or the 10 top Kodi skins for touchscreen devices. Once you have verified these minimum requirements, we can start the simple process to add Kodi subtitles.
Recommended HTPC / Home Server Builds:
- Best Home Theater PC Build 2017 to do it all (Plex, Kodi, NAS, Gaming)
- Best Emby Server builds 2018 – Pre-built and DIY options
- Medium Budget 4K HTPC Build 2017 for Kodi, Plex and Gaming
- Cheap 4K HTPC Build for Kodi, OpenELEC, and LibreELEC 2017
- Low Power Home Server Build 2017 for Network File and Media Storage
- Best HTPC for Kodi with 4K on a Medium Budget 2017 (~$400)
- Energy efficient budget HTPC-NAS combo build 2016
Setup Kodi subtitles language
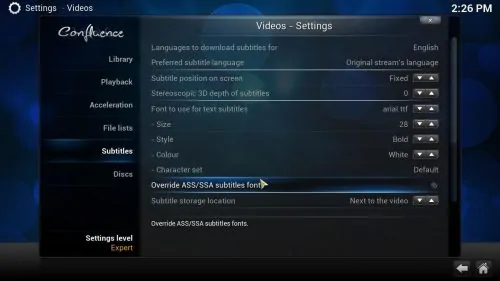
Head to System -> Settings -> Video -> Subtitles from the Kodi main menu, and you will a screen similar to the one above. In this screen, you can setup Kodi subtitles the way you like. You can change the subtitle language, the service they download from, and even their appearance. Click on Languages to download subtitles for, and select your preferred languages. For this example I'll choose English and Spanish. After you're done selecting the language of subtitles on Kodi, click OK.
Choose a service for subtitles on Kodi
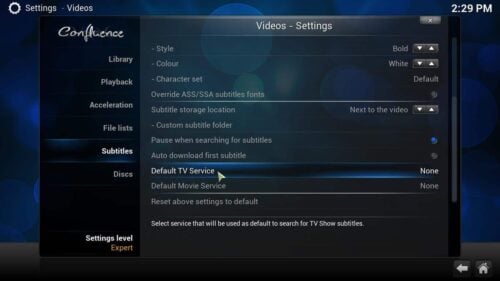
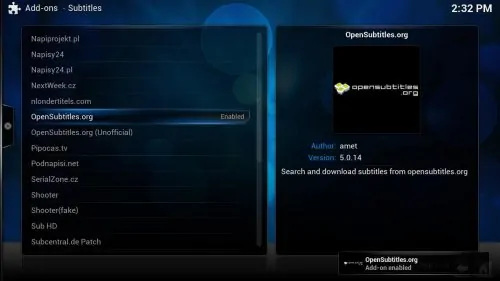
Scroll down on that dialog box, until you see Default Movie Service. Click on it, and an empty dialog will appear. On this dialog, click on Get More... in order to add Kodi subtitles services. You will see a Kodi subtitle add on list. For our example, scroll until you get to OpenSubtitles.org and click it, then click Install on the box that appears. You will see a notification similar to the one on the bottom right of the screenshot below, once you have successfully enabled the service to add Kodi subtitles. Keep in mind you can add other services as well from the list, though the OpenSubtitles.org Kodi subtitles service is fairly complete and useful.
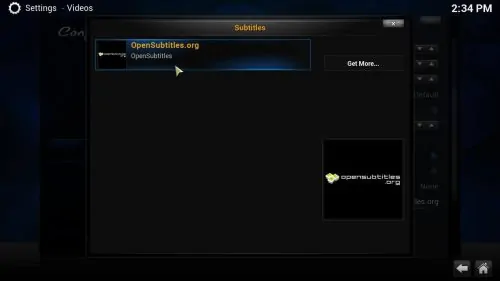
After you're done with this, go back, and click on Default Movie Service again, then click on OpenSubtitles.org. Do the same for your Default TV Service if you like. This will add subtitles to your TV shows as well, in case you use addons for TV shows. [Read: 10 best Kodi Live TV addons in 2015 for your HTPC]
Add subtitles to Kodi playback
You're all set now. Browse your addons or media content for a movie or a TV show and click the subtitles button when playback starts. You will see a small menu with a Download button. Click on it so you can add Kodi subtitles to your media.

When you click on that button, a floating menu will come up. It will allow you to add Kodi subtitles to the movie you are watching. Ratings are displayed beside the subtitles, so make sure you select one with a good enough rating, for the best experience.
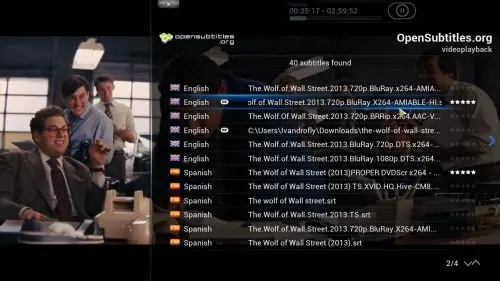
After clicking on any of the subtitles, they will start downloading, and shortly after that, you will see the subtitle menu changed. In order to add Kodi subtitles to your movie, these must be enabled here.

And that's it, now your playback has subtitles!

Kodi Subtitles - Final Thoughts
If you don't like their default appearance (which I find rather easy on the eyes and useful, but to each their own, I guess), you can change it on the subtitle menu, the first one we saw on this tutorial. There you can change the font and color, among other things. All of this setup can be done via a wireless HTPC keyboard or a remote app such as Kore, the official XBMC/Kodi remote app, so you won't even have to get up from your couch to add Kodi subtitles.


![15 Best Jellyfin Plugins [2023] - Supercharge your Media Server Jellyfin Intros Plugin Preview Pre-Roll](https://www.smarthomebeginner.com/images/2022/08/jellyfin-intros-preroll-preview.jpg)
![15 Best Plex Alternatives [2022] - FREE and BETTER Options Best Plex Alternatives feature image](https://www.smarthomebeginner.com/images/2022/08/best-plex-alternatives-feature-image.gif)


![20 Working websites to watch March Madness online FREE [2022] Watch March Madness Online Free](https://www.smarthomebeginner.com/images/2022/03/march_maddness-scaled.jpg)
![Watch College Football Online FREE [2022]- 25+ WORKING websites 2022 Watch College Football Online Free](https://www.smarthomebeginner.com/images/2022/08/2022-watch-college-football-online-free.jpg)