Kodi addons can provide a boost to your content and your media center. The installation of repositories and addons allows for a greatly customizable Kodi experience, in addition to things like skins for Kodi or keyboard and mouse remote controls, repositories are one of the things that make your Kodi experience unique. By installing a Kodi addons repository like SuperRepo, you can get access to content that you normally wouldn't have access to. For example, many Kodi addons for kids are located within additional repositories that have to be installed prior to locating and downloading these addons. If you find the installation of repositories to be complex, here we offer you a guide which will show you how to install SuperRepo on Kodi. Of course, you can also apply the steps found in this guide to install other repositories as well, with slight variations.
Recommended HTPC / Home Server Builds:
- Best Home Theater PC Build 2017 to do it all (Plex, Kodi, NAS, Gaming)
- Best Emby Server builds 2018 – Pre-built and DIY options
- Medium Budget 4K HTPC Build 2017 for Kodi, Plex and Gaming
- Cheap 4K HTPC Build for Kodi, OpenELEC, and LibreELEC 2017
- Low Power Home Server Build 2017 for Network File and Media Storage
- Best HTPC for Kodi with 4K on a Medium Budget 2017 (~$400)
- Energy efficient budget HTPC-NAS combo build 2016
SuperRepo Setup on Kodi
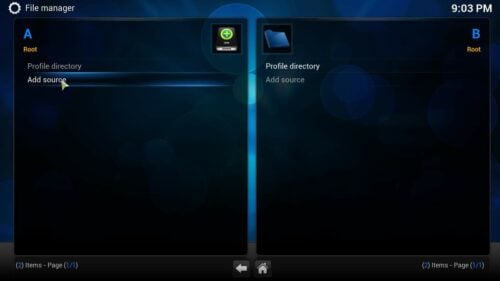
Before you can install SuperRepo, you need to first add the SuperRepo source. From the homescreen on Kodi, head to System->File Manager. Then click Add source, as shown in the picture below.
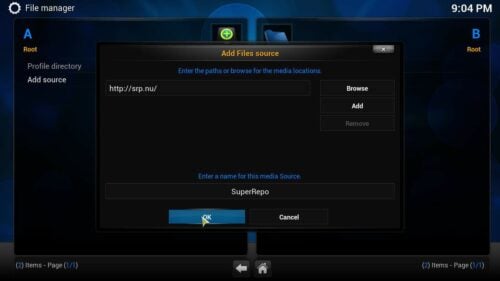
Continue SuperRepo setup by selecting a source for it in the window that appears. There are two text fields: on the top one, you can set the media location, and the bottom one allows you to set a name for it. Set the media location to SuperRepo source http://srp.nu (SRP comes from SuperRePo). In the bottom box, and add a name for the source of your SuperRepo installation. Try to type something descriptive, since this will come in handy when you manage several sources. As an example, you could simply name it "SuperRepo". The filled SuperRepo source addition window should look like the example below. After you have filled out the boxes, click OK, to continue to install SuperRepo for Kodi.
As you can see, you now have SuperRepo source successfully installed on your system. Click on the home button to get back to the main menu.
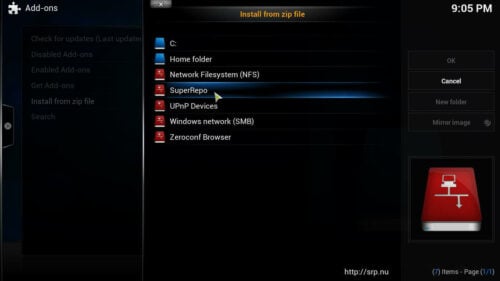
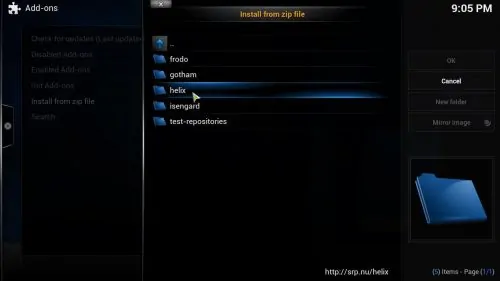
To continue with the SuperRepo installation, from the home menu, you need to go to System->Settings->Add-ons and click Install from zip file. Next, you need to click on the source you added. In this case, select SuperRepo from the menu.
You will see several folders. I would advise choosing the one named after your Kodi version. In my case it was "Helix".
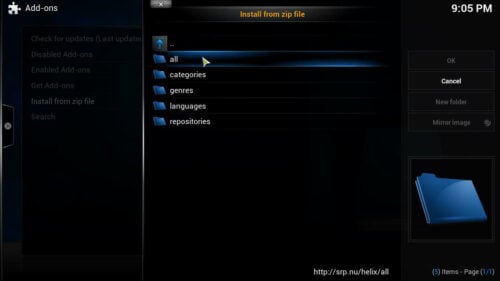
And then select the folder named "All".
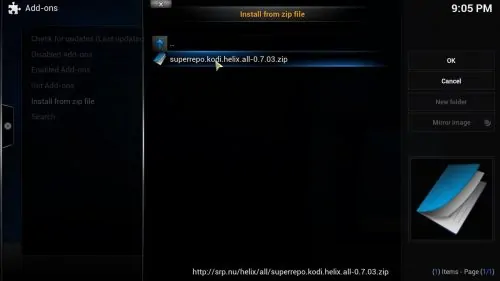
You will see a .zip file. This .zip file will allow you to install SuperRepo. Select it and click "OK".
After a few moments you should see something like this on the bottom-right corner of your screen, indicating that you were able to successfully install SuperRepo.

And that's it! You should be able to get addons from this repository if you head to System->Settings->Add-ons->Get Add-ons, and then selecting SuperRepo from there. If you want to know more about this repository, you can check out its official website. We hope this guide helps you set up your Kodi HTPC to your liking, by having access to new content from one of the largest repositories on the entire web. Go ahead install SuperRepo and enjoy the wealth of content this repository has to offer.


![15 Best Jellyfin Plugins [2023] - Supercharge your Media Server Jellyfin Intros Plugin Preview Pre-Roll](https://www.smarthomebeginner.com/images/2022/08/jellyfin-intros-preroll-preview.jpg)
![8 Amazing Raspberry Pi Ideas [2022]: Beginners and Enthusiasts Raspberry Pi ideas](https://www.smarthomebeginner.com/images/2021/09/raspberry-pi-4-dev-board.jpg)
![15 Best Plex Alternatives [2022] - FREE and BETTER Options Best Plex Alternatives feature image](https://www.smarthomebeginner.com/images/2022/08/best-plex-alternatives-feature-image.gif)
![20 Working websites to watch March Madness online FREE [2022] Watch March Madness Online Free](https://www.smarthomebeginner.com/images/2022/03/march_maddness-scaled.jpg)
![Watch College Football Online FREE [2022]- 25+ WORKING websites 2022 Watch College Football Online Free](https://www.smarthomebeginner.com/images/2022/08/2022-watch-college-football-online-free.jpg)
![Watch NFL Games Live FREE 🏈: 23+ WORKING websites [2023] Watch NFL Games Live FREE](https://www.smarthomebeginner.com/images/2023/08/nfl-streaming-1.jpg)