As a WordPress blog gains more visibility and followers, the load on the server increases and so does the bandwidth. If you are running a low power server that is not designed to handle the load or you are behind a network and have to watch your bandwidth then this post may come to your help. Even if the above statements are not true for you, this post may still benefit you by decreasing the page load times for your visitors and improve performance of WordPress blog.
As you may or may not know I am running an Dual Core Atom 330 based Ubuntu Server that works as a Media Center HTPC running XBMC, download station, network backup drive, and the file server. This is too much to ask from a small 6 Watt processor. Fortunately, my server can handle it. But I still have to try and make it as easy as possible for it.
After researching, I found that Caching is one of the easiest things you could do to achieve the above objectives and there are couple of WordPress plugins that could do this with just a few clicks. Caching works by storing frequently accessed files, pages, and database queries in the memory and serves them when they are requested again. The PHP page does not have to be processed again or the database does not have to be queried again, thereby saving some power and bandwidth and reducing page load times.
If you search WordPress plugin directory for cache plugins, several of them show up. The most popular ones are: WP Super Cache, Quick Cache, W3 Total Cache, WP Widget Cache, DB Cache Reloaded Fix, and several others. Some say they cannot be combined (for example, WP Super Cache has problems working in tandem with some of the other plugins). What I am going to describe are 2 caching plugins that are available today that have worked best for me with minimal work.
Quick Cache (Speed Without Compromise)

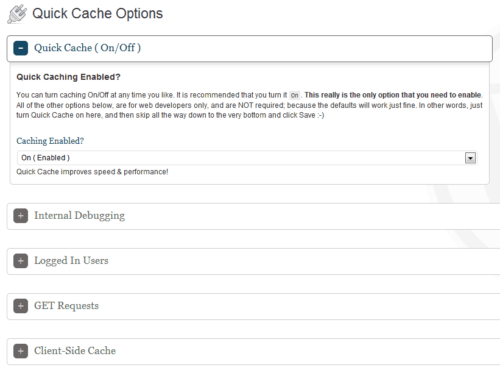
Quick Cache is truly a set it and forget type of plugin. All you have to do is install the plugin and enable it. Quick Cache starts doing its magic. I saw an instant increase in my page load speeds. The author describe the plugin as follows:
If you care about the speed of your site, Quick Cache is one of those plugins that you absolutely MUST have installed. Quick Cache takes a real-time snapshot (building a cache) of every Page, Post, Category, Link, etc. These snapshots are then stored (cached) intuitively, so they can be referenced later, in order to save all of that processing time that has been dragging your site down and costing you money.
The Quick Cache plugin uses configuration options, that you select from the options panel. See: Config Options under Quick Cache. Once a file has been cached, Quick Cache uses advanced techniques that allow it to recognize when it should and should not serve a cached version of the file. The decision engine that drives these techniques is under your complete control through options on the back-end. By default, Quick Cache does not serve cached pages to users who are logged in, or to users who have left comments recently. Quick Cache also excludes administrational pages, login pages, POST/PUT/GET requests, CLI processes, and any additional User-Agents or special pattern matches that you want to add.
Store Cache in RAM:
Follow this step only if you run your blog on your own Linux server. If you would like to go one step further you can store the cache in RAM memory, which is faster than a Hard Drive. Quick Cache requires you to create a cache folder under wp-content folder and give it write permissions. Therefore first cd into the wp-content folder and create a the cache folder:
mkdir cache
chmod 775 cache
Then open /etc/fstab as sudo using the following command:
sudo nano /etc/fstab
Add the following line:
tmpfs /PATHTOCACHEFOLDER/wp-content/cache tmpfs defaults,noatime,mode=1777 0 0
Remember to replace PATHTOCACHEFOLDER with appropriate path information. For example, if your blog/website is located under /var/www/myblog then the full path to the cache folder would be /var/www/myblog/wp-content/cache. Save and exit. After your next reboot your cache should now be stored in RAM memory, giving you that extra boost of speed.
WP Widget Cache
The next cache plugin that I found to complement Quick Cache is the WP Wiget Cache plugin. It works well with Quick Cache and has a slightly different role than Quick Cache. As the name suggests WP Widget Cache caches widgets on your blog. Widget normally do not change from one page to another and WP Widget Cache harnesses this concept to reduce loading times for widgets on your page. The author recommends its use with WP Super Cache plugins but I found it to work well with Quick Cache as well.
Here is how the author describes this plugin:
WP Widget Cache can cache the output of your blog widgets. Usually it will significantly reduce the SQL queries to your database and speed up your site. If your site gets a very high traffic, or your blogs are hosted on a shared server, or Google crawls your site frequently, you do need cache. If you use widgets, you do need WP Widget Cache.
If some of your pages are very popular, and people keep visiting this page, then the page cache will be very helpful. But what if the user click some link and visit another page of your blog, or Google is crawling your site? Cache another whole page? Actually that’s not necessary for most time. As we all know, WordPress shares the same widgets, they’re all the same, maybe on all the pages of your site. For example, the Categories widget, this maybe never change, the Archives widget, maybe changes once a month. So it’s really really not that necessary to query the database again, especially when you use a lot of widgets.
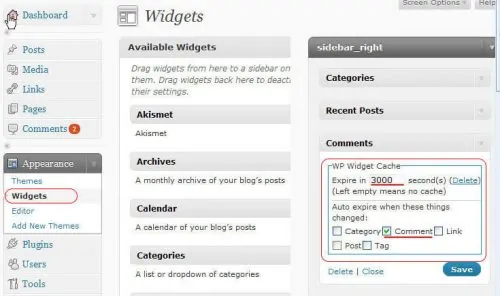
WP Widget Cache is not to replace the WP-Cache or WP Super Cache, it’s a plus for them, as it reduces the cost for caching a new page. You can set the cache time for each widget individually, seconds to years, whatever you like. For Categories widget, days maybe fine, for Recent Comments widget, seconds maybe fine.
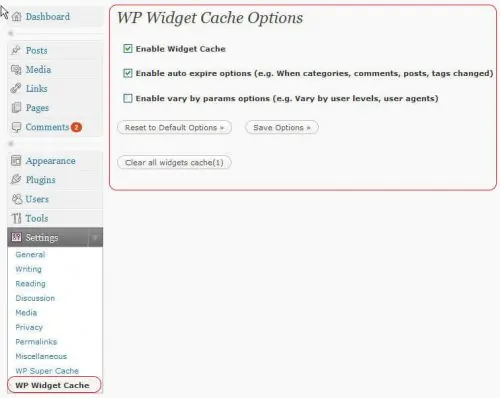
If you have dynamic widgets (examples: different widgets on different pages, different widgets for different users, etc.) they should not be cached. This can be easily managed by leaving cache expire time as empty or 0 in the widget settings section.
You can install the two plugins as you would install any other plugin on your WordPress blog. For ease of installation or convenience, you may enable SSH / SFTP on your WordPress blog.
Enable Gzip Compression of Pages
Compressing pages before sending it to the visitors browser (which then decompress the pages) is a simple and effective way to save bandwidth and speed up your site. While this might slightly increase CPU usage (for compression) the benefits are a lot more. Compression used to be a problem previously but these days most of them use newer/better browsers. Most of the internet traffic is from newer browsers and it does not make sense to slow down your pages because of few people who are stuck with older browsers (or IE :-p). But don't worry, the code I am going to give you should work for both older and newer browsers.
To achieve this in Apache mod_deflate module is required (mod_gzip on older Apache installs). To enable this module do the following in terminal:
sudo a2enmod deflate
After enabling the deflate module, you can achieve compression two ways:
- Compressing all websites running on your server
- Compressing just one site / blog
If you want the first option add the code below to /etc/apache2/mods-available/deflate.conf file. If you want the second option add the code to .htaccess file in the root of the site.
<ifmodule mod_deflate.c>
 # DEFINE FILE TYPES FOR COMPRESSION
 AddOutputFilterByType DEFLATE text/html text/xml text/css text/plain
 AddOutputFilterByType DEFLATE application/xhtml+xml application/xml
 AddOutputFilterByType DEFLATE application/rdf+xml application/rss+xml application/atom+xml
 AddOutputFilterByType DEFLATE text/javascript application/javascript application/x-javascript
 AddOutputFilterByType DEFLATE application/x-font-ttf application/x-font-otf
 AddOutputFilterByType DEFLATE font/truetype font/opentype
 # IGNORE OLD BROWSERS THAT CANNOT HANDLE GZIP COMPRESSION
 BrowserMatch ^Mozilla/4 gzip-only-text/html
 BrowserMatch ^Mozilla/4.0[678] no-gzip
 BrowserMatch bMSIE !no-gzip !gzip-only-text/html
</ifmodule>
This code is written in such a way that it works only if the mod_deflate module is enabled. If your hosting server does not have this module enabled the compression codes will be ignored. Similarly, if your visitor's browser is old and cannot handle compression, then compression will not take place. This code also does not compress images or compressed files which cannot be effectively compressed.
If you can't edit your .htaccess file, then do not worry. You can setup PHP to return compressed content. Just rename your .html files to .php and add the following code to the top of the page:
< ?php if (substr_count($_SERVER['HTTP_ACCEPT_ENCODING'], 'gzip')) ob_start("ob_gzhandler"); else ob_start(); ?>
My recommendation is to make Apache compress your files as the latter method involves editing your sites files.
Verifying Compression
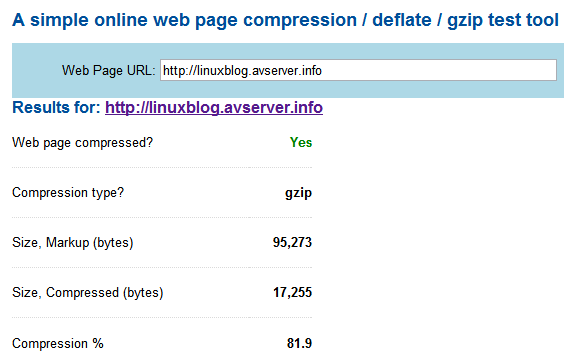
There are two simple ways (other methods also exist) you can verify whether your gzip compression is working. The easiest way is the online web page compression / deflate / gzip test tool. Just enter the URL to your website/blog and hit "Check". You should see something similar to this:
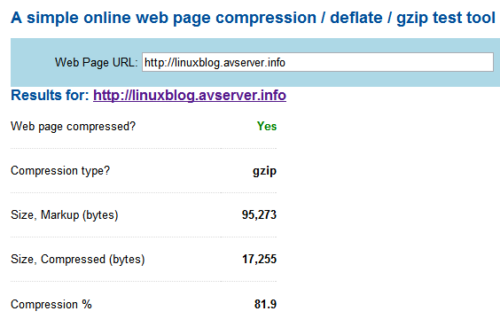
As you can see the above page was compressed nearly 82% before being served to the visitor. This is a big saving in bandwidth and speed.
The other method is to use some browser plugins such as Live HTTP Headers. Open your website/blog and look for something like "Compression enabled" or "Compression: gzip". This means that the page was received by the browser in compressed form.
Enjoy the speed and performance improvement. If you have other ways that have worked better for you please share them with us in the comments section.



![10 Best Media Server for Plex + one SURPRISING bonus [2022] Media Server for Plex](https://www.smarthomebeginner.com/images/2020/04/plex-free-movies-and-tv.jpg)
![5 Best Mini PC for Proxmox Home Server [2024] Best Mini PC for Proxmox](https://www.smarthomebeginner.com/images/2024/04/Best-Mini-PC-for-Proxmox.png)

![8 Best NAS with Plex Server Support [2022] - 4k, Transcoding, etc. Best NAS Server for Plex](https://www.smarthomebeginner.com/images/2020/02/best-media-server-for-plex-ft.jpg)