We have extensively covered how to install Sick Beard on various platforms but how do you properly uninstall SickBeard on Ubuntu system? This is a question that has been asked a few times and so here is the guide. This Sick Beard uninstall guide will work irrespective of whether you used our Sick Beard Ubuntu installation guide or the easier Atomic SickBeard installer. So let us see how to uninstall SickBeard on Ubuntu. [Read: Video: Install SickBeard on Ubuntu 14.04 in one step]
Looking for an automated solution? Try our AtoMiC ToolKit, which makes installation and management of Home Server software such as SickBeard, CouchPotato, Torrent clients, etc. easy.
Table of Contents
Uninstall SickBeard on Ubuntu
While the method described below is for Ubuntu, you should be able to use it to uninstall Sick Beard on other Debian or Ubuntu based Linux distributions. The key is to have SickBeard files installed in your home folder under .sickbeard. This is what our SickBeard install guides do. If yours is installed in another folder, don't worry just change the path in the steps below and you should be able to remove SickBeard completely. [Read: Install Sick Beard with Piratebay torrent support on Ubuntu]
1. Stop SickBeard
First open terminal and stop any running Sick Beard instance with the following command:
sudo service sickbeard stop
Then ensure that Sickbeard is stopped:
sudo service sickbeard status
You should see an output like this * sickbeard is not running. [Read: 5 Best Usenet Search providers for Sick Beard and CouchPotato]
2. Remove SickBeard Autostart Entry
If you have your SickBeard install to autostart on boot, then remove it with the following command:
sudo update-rc.d -f sickbeard remove
You should see an output that looks similar to the one below:
Removing any system startup links for /etc/init.d/sickbeard ...
   /etc/rc0.d/K20sickbeard
   /etc/rc1.d/K20sickbeard
   /etc/rc2.d/S20sickbeard
   /etc/rc3.d/S20sickbeard
   /etc/rc4.d/S20sickbeard
   /etc/rc5.d/S20sickbeard
   /etc/rc6.d/K20sickbeard
3. Delete SickBeard Startup Scripts
While this is optional, you may want to remove the two scripts below for complete SickBeard uninstall.
sudo rm /etc/default/sickbeard
sudo rm /etc/init.d/sickbeard
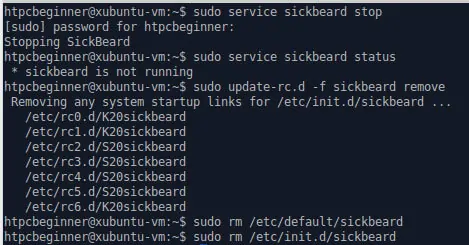
Uninstalling SickBeard on Ubuntu and other similar systems is very easy and running the above steps should proceed without any problems as shown in the screenshot below.
4. Remove Sick Beard Files
This again is optional. Following this step will remove all Sick Beard files including the database and settings. If you want to reinstall SickBeard at a later date you will have to configure Sick Beard and scan your database from scratch. [Read: SickBeard alternative: NzbDrone vs SickBeard]
Best Standalone Bittorrent Downloaders:
If you followed our installation guides and all the above steps worked without any issues then you may delete SickBeard Files using the commands below:
cd ~
sudo rm -r .sickbeard
Again, this assumes that your SickBeard files are located inside .sickbeard directory in your home folder. You may use ls -al command to verify this or change the path if you already know the location.
Sometimes it is necessary, especially if you are setting up your system, to uninstall Sick Beard and start over from scratch. Or you may want to move to a SickBeard Alternative such as NzbDrone. Either way, the above method should help you uninstall SickBeard on Ubuntu and other similar Linux distros.


![[Video] Install Docker and Docker Compose on Ubuntu - Don't Do It WRONG Video Thumbnail: Install Docker on Ubuntu (with Compose) – Don't Do It WRONG](https://www.smarthomebeginner.com/images/2023/03/install-docker-on-ubuntu-with-co-1.jpg)

